이전 글에서 Exception을 직접 처리하는 ExceptionResolver를 만들어보았다. Exception 종류에 따라 statusCode와 message를 넣은 뒤, ModelAndView를 반환하는 방식으로 진행했다. 이번에는 직접 만들지 않고, 스프링이 제공하는 ExceptionResolver를 편리하게 사용해본다.
1. 스프링 부트가 제공하는 ExceptionResolver 종류
스프링 부트에는 HandlerExceptionResolverComposite 이라는 파일에 다음 순서로 ExceptionResolver 들이 등록되어있다.
1. ExceptionHandlerExceptionResolver
2. ResponseStatusExceptionResolver
3. DefaultHandlerExceptionResolver
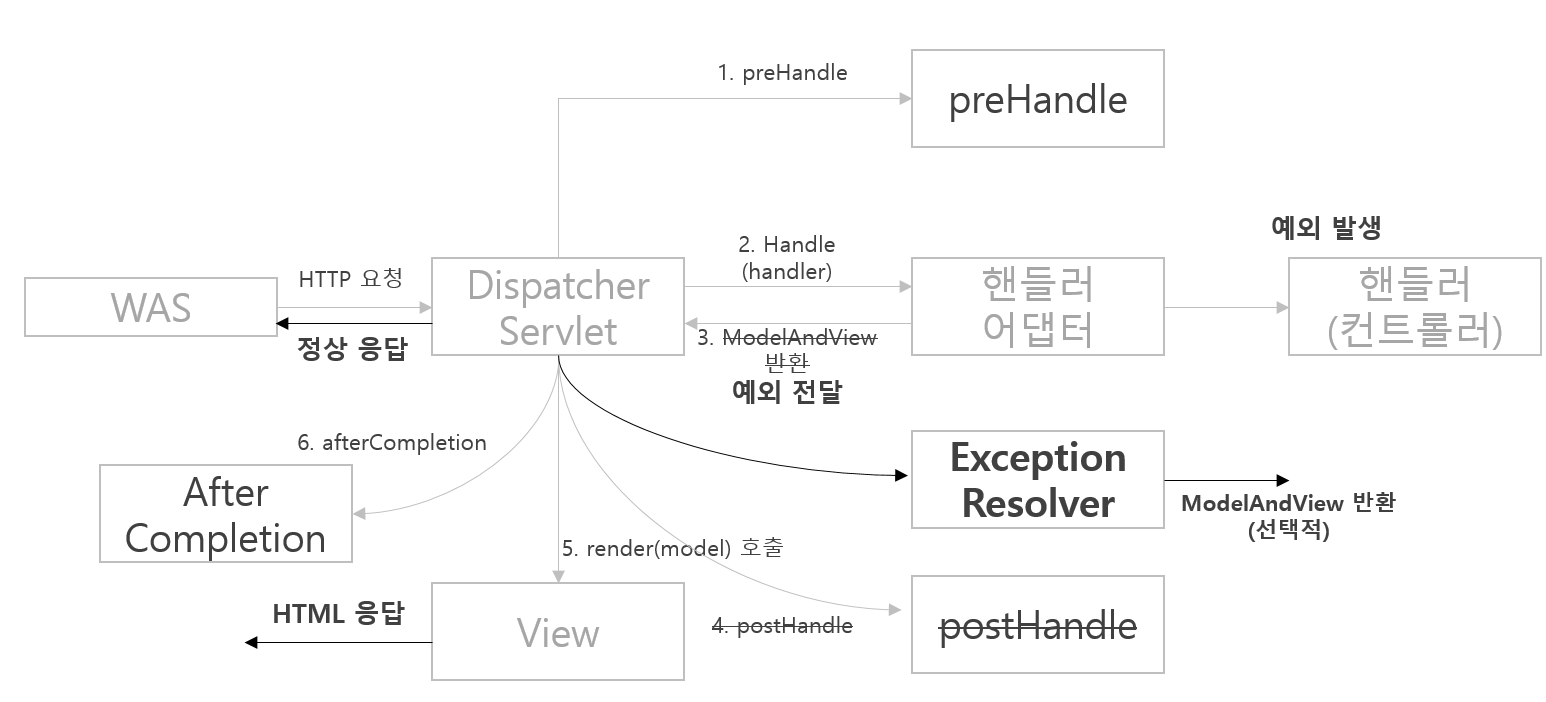
순서대로 호출되어 Exception을 처리하는 시도를 한다. 만약 1번 Resolver에서 null을 반환하면, 다음 2번 Resolver가 호출되어 정상 응답 처리를 시도하는 형태이다. 이전 글에서 null 반환 시 다음 ExceptionResolver를 호출하여 에러 해결 시도를 한다고 했었다.
원래 흐름
예외 발생 -> 서블릿 -> WAS -> 서블릿 -> 핸들러
변경 흐름
예외 발생 -> 서블릿 -> ExceptionResolver -> ...
2. ResponseStatusExceptionResolver
가장 쉬운 ResponseStatusExceptionResolver부터 다뤄보자. 이 Resolver는 예외에 따라서 HTTP 상태 코드를 지정해주는 역할을 한다. @ResponseStatus로 등록된 예외 또는 ResponseStatusException 예외를 처리해준다.
@ResponseStatus 사용해보기
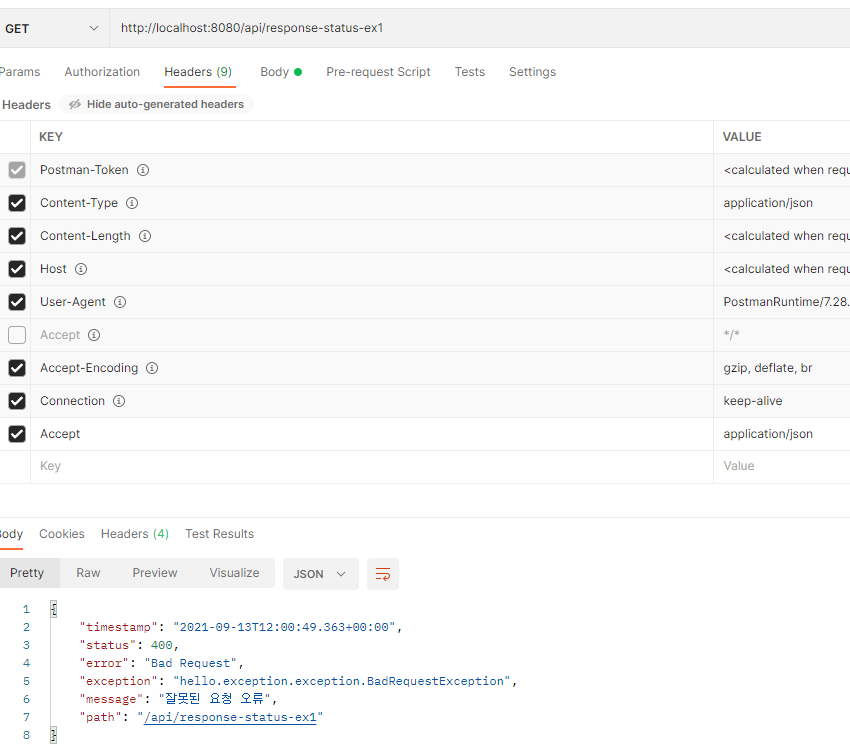
테스트를 위해 Exception을 하나 만들고, Controller에서 매핑 해보자. @ResponseStatus 어노테이션을 달아주었다. code 속성으로 HttpStatus를 지정하고, reason으로 Exception의 message로 들어갈 내용을 작성해줄 수 있다.
message
다만, message로 지정된 값은 앞서 배운 바대로 application.properties의 message 속성값을 활성화 해주어야 한다.
server.error.include-message=always
그리고 하드코딩의 형태가 아니라, "error.bad"와 같이 messages.properties 파일에서 메시지화하여 Exception의 message를 지정해줄 수도 있다.
java/hello/exception/exception/BadRequestException.java
|
1
2
3
4
|
@ResponseStatus(code = HttpStatus.BAD_REQUEST, reason = "잘못된 요청 오류")
public class BadRequestException extends RuntimeException{
}
|
cs |
java/hello/exception/api/ApiExceptionController.java
|
1
2
3
4
5
6
7
8
|
...중략
@GetMapping("/api/response-status-ex1")
public String responseStatusEx1() {
throw new BadRequestException();
}
...
|
cs |
요청-응답 결과
처리 방식
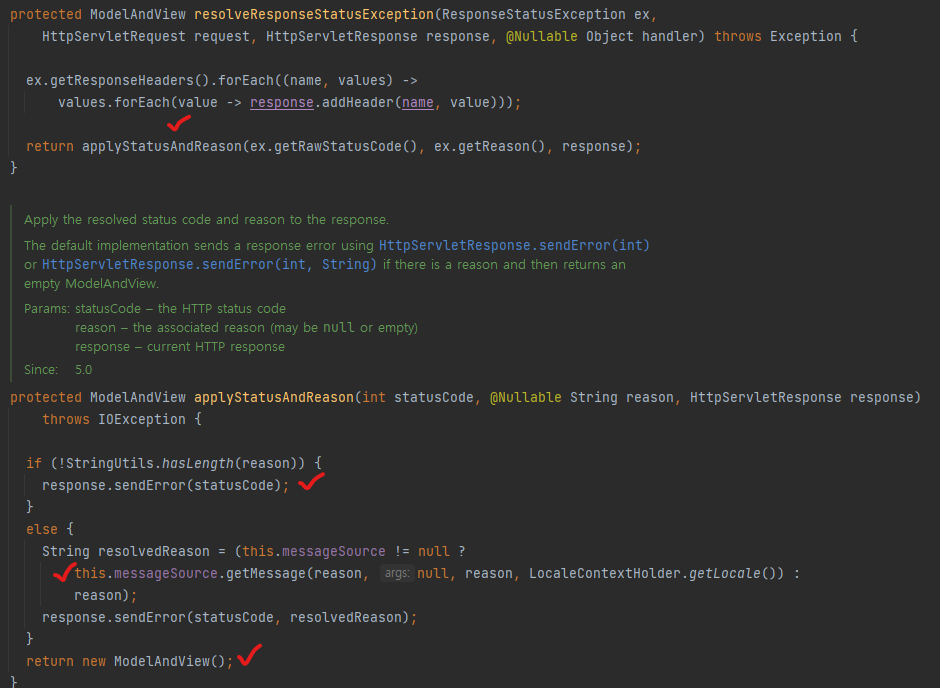
ResponseStatusExceptionResolver를 검색하여 살펴보자.
기본적으로 ModelAndView를 반환하는 방식이나, instanceof를 통해 Exception의 형태를 살펴보는 방식 등 앞선 글에서 직접 작성했던 ExceptionResolver와 유사한 형태임을 알 수 있다. 여기서 resolveResponseStatusException 메서드를 살펴보면,

applyStatusAndReasone이라는 메서드를 호출하고, 이 메서드는 response.sendError, this.messageSource, return new ModelAndView();와 같이 이전에 배운 방식과 같은 방식으로 Exception을 처리하는 것을 볼 수 있다.
ResponseStatusException 사용
ResponseStatusExceptionResolver는 @ResponseStatus와 ResponseStatusException을 처리해준다고 했다. 위에서 살펴본 @ResponseStatus는 편하지만, 어노테이션을 적용할 수 없는 라이브러리에 적용할 수 없고, 어노테이션 기반이라서 조건에 따라 동적으로 변경하는 것이 어렵다. 그런 경우에 ResponseStatusException을 사용한다.
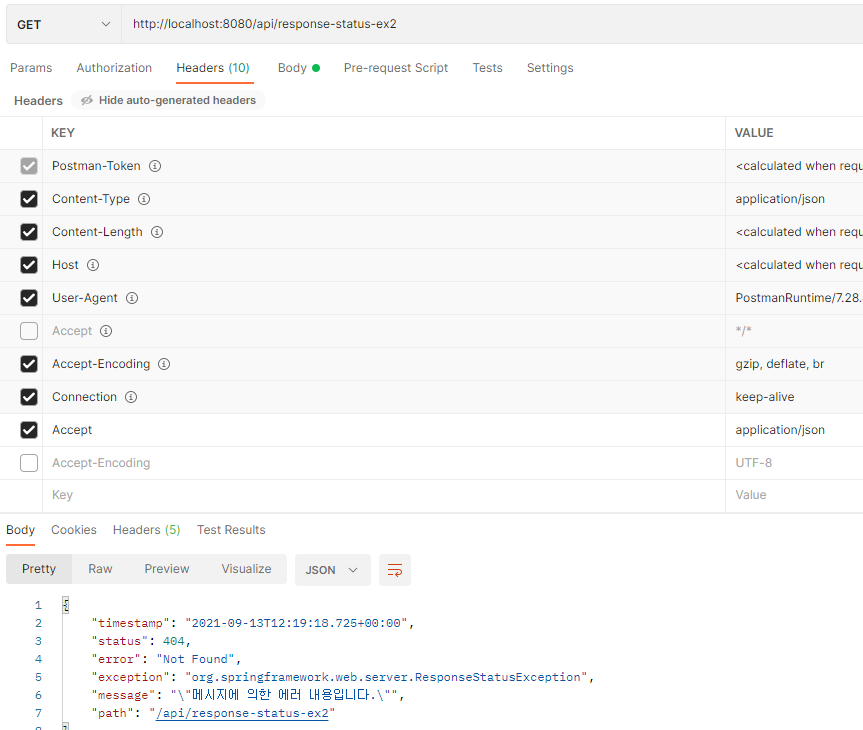
Controller에서 ResponseStatusException을 반환하도록 해보자. 파라미터로 HttpStatus, messageSource, Exception 객체를 받는다.
java/hello/exception/api/ApiExceptionController.java
|
1
2
3
4
5
6
7
8
9
10
|
...중략
@GetMapping("/api/response-status-ex2")
public String responseStatusEx2() {
throw new ResponseStatusException(HttpStatus.NOT_FOUND, "error.bad", new IllegalArgumentException());
}
...중략
|
cs |
결과를 확인해보면, 잘 처리되어 ResponseStatusException이 전달된 것을 볼 수 있다.
3. @ExceptionHandler
ExceptionHandlerExceptionResolver
앞서 다뤘던 API 예외 처리기들은 HandlerExceptionResolver의 형태로, ModelAndView를 반환해야 했다. 그래서 response에 직접 HTTP의 header 값 등을 설정하는 등 코드도 복잡해졌다. 그러나 API 응답에는 ModelAndView가 필요하지 않다.
게다가 특정 컨트롤러 및 API에서만 발생하는 에러를 처리하기도 어렵다. Controller1에서 RuntimeException, Controller2에서 RuntimeException이 동일하게 발생했는데, 다른 오류 응답을 내보내기 위해서, header 정보 등을 일일이 바꿔주어야 한다.
이런 불편한 점들을 해결하기 위해 스프링이 ExceptionHandlerExceptionResolver를 제공해주며, 이것이 앞서 살펴본 바와 같이 기본으로 제공되는 ExceptionHandler 중에서도 우선순위가 가장 높다.
@ExceptionHandler 사용해보기
이전에 사용했던 ApiExceptionController의 코드를 복사해와서, ApiExceptionV2Controller를 작성해본다.
@ExceptionHandler 어노테이션을 달아주고, 속성값으로 받아올 Exception 타입을 작성해준다. 그리고 반환값으로 ErrorResult 객체를 반환해주면 된다. 이렇게 하면 빈 ModelAndView 객체를 반환했을 때와 마찬가지로 정상흐름으로 전환되고, ErrorResult 객체가 json 형태로 반환된다. 다만, @RestController를 적용했기 때문에 @ResponseBody와 같이 json 객체 형태로 에러 내용이 반환되는 것이다. 만약 단순 @Controller를 적용한다면, ErrorResult가 반환되지 않고 다른 기본 ExceptionHandler에 의해 스프링부트의 기본 에러 형태의 객체가 반환된다.
java/hello/exception/api/ApiExceptionV2Controller.java
|
1
2
3
4
5
6
7
8
9
10
11
12
13
14
15
16
17
18
19
20
21
22
23
24
25
26
27
28
29
30
31
32
33
34
35
36
|
@Slf4j
@RestController
public class ApiExceptionV2Controller {
@ExceptionHandler(IllegalArgumentException.class)
public ErrorResult illegalExHandler(IllegalArgumentException e) {
log.error("[exceptionHandler] ex", e);
return new ErrorResult("BAD", e.getMessage());
}
@GetMapping("/api2/members/{id}")
public MemberDto getMember(@PathVariable String id) {
if (id.equals("ex")) {
throw new RuntimeException("잘못된 사용자");
}
if (id.equals("bad")) {
throw new IllegalArgumentException("잘못 입력된 값");
}
if (id.equals("user-ex")) {
throw new UserException("사용자 오류");
}
return new MemberDto(id, "hello " + id);
}
@Data
@AllArgsConstructor
static class MemberDto {
private String memberId;
private String name;
}
}
|
cs |
응답 결과
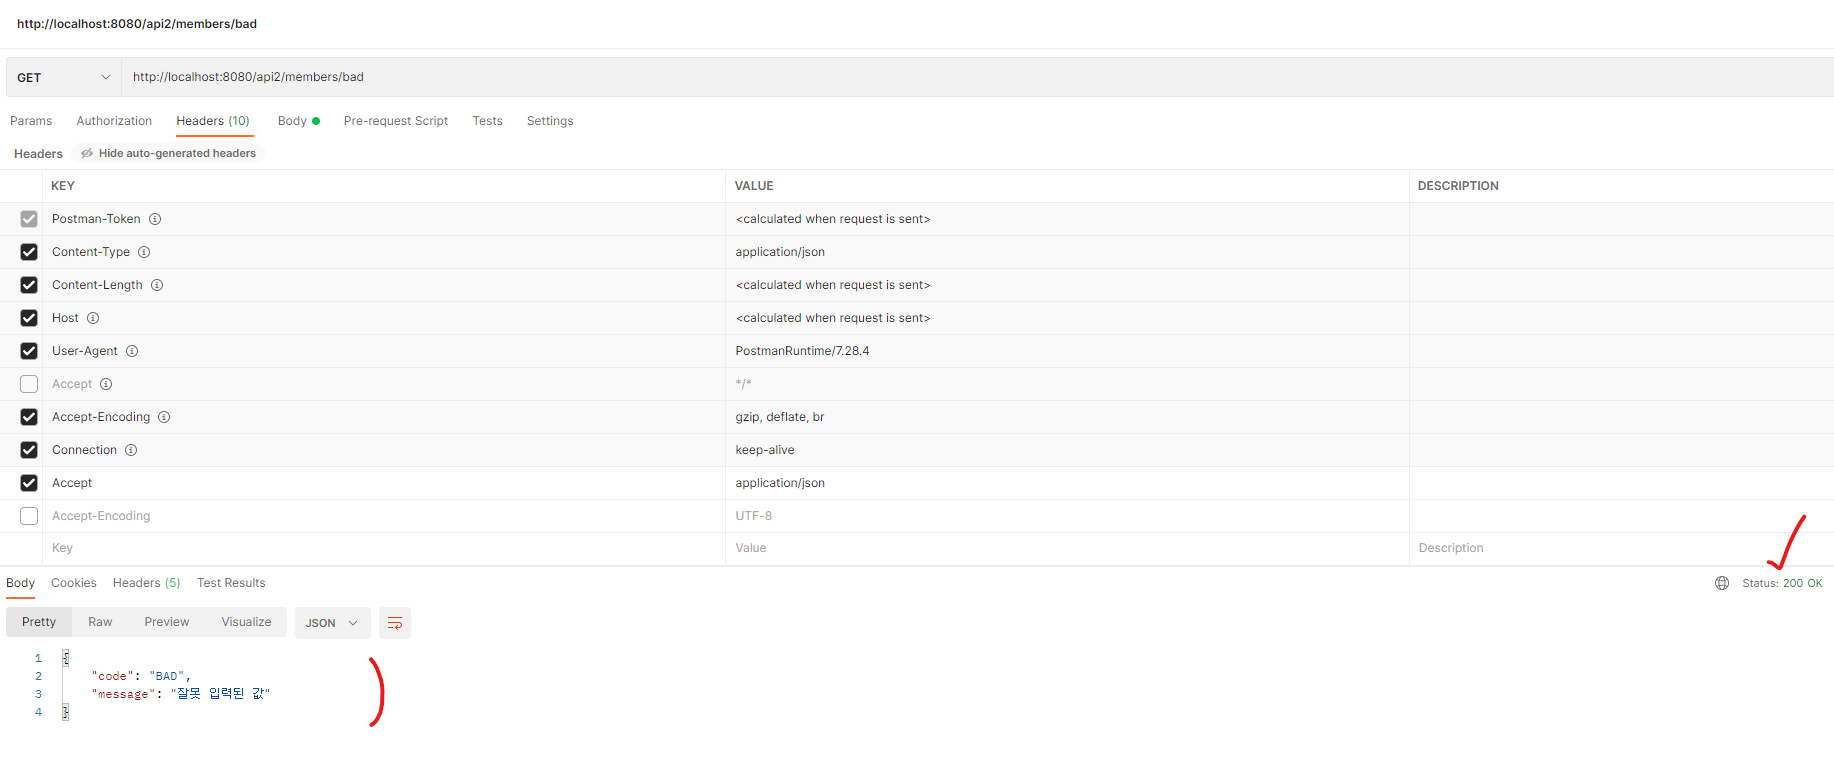
응답 결과를 보면 정상흐름이기 때문에 200 OK 상태로 응답이 온 것을 볼 수 있다. 그래서 Http 상태 코드값을 변경해줘야 하는데, 이것은 @ResponseStatus를 적용하면 된다.
java/hello/exception/api/ApiExceptionV2Controller.java
|
1
2
3
4
5
6
7
8
9
10
11
12
13
|
@Slf4j
@RestController
public class ApiExceptionV2Controller {
@ExceptionHandler(IllegalArgumentException.class)
@ResponseStatus(HttpStatus.BAD_REQUEST)
public ErrorResult illegalExHandler(IllegalArgumentException e) {
log.error("[exceptionHandler] ex", e);
return new ErrorResult("BAD", e.getMessage());
}
...중략
|
cs |
ResponseEntity로 반환하기, Exception 계층별 처리 원리
ResponseEntity 형태로도 반환할 수 있다.
@ExceptionHandler의 속성값으로 굳이 Exception의 종류를 작성해주지 않아도, 메서드의 파라미터로 받는 Exception을 처리 해준다. 하지만 만약 여러 종류의 예외를 한번에 처리하고 싶다면, 속성값 안에 여러 Exception 클래스들을 적어주어야 한다.
ex) @ExceptionHandler({XxxException.class, YyyException.class})
그리고 단순히 파라미터로 들어간 Exception의 종류만 처리해주는 것이 아니라, 해당 Exception을 상속받는 Exception들을 모두 처리해준다.
마지막 exHandler를 보면, Exception을 처리하도록 되어있다. Exception 객체는 모든 Exception들의 최상위 객체이기 때문에, 별도로 정의되지 않은 Exception이 발생할 경우, Exception을 처리하는 exHandler로 예외가 가게되어 예외 처리가 되는 것이다. 스프링 기본에서 배운 바와 같이, 스프링은 항상 구체적인 부분이 우선적으로 동작한다는 점을 다시 떠올려보자.
java/hello/exception/api/ApiExceptionV2Controller.java
|
1
2
3
4
5
6
7
8
9
10
11
12
13
14
15
16
17
18
19
20
21
22
23
24
25
26
27
28
|
@Slf4j
@RestController
public class ApiExceptionV2Controller {
@ExceptionHandler(IllegalArgumentException.class)
@ResponseStatus(HttpStatus.BAD_REQUEST)
public ErrorResult illegalExHandler(IllegalArgumentException e) {
log.error("[exceptionHandler] ex", e);
return new ErrorResult("BAD", e.getMessage());
}
@ExceptionHandler
public ResponseEntity<ErrorResult> userExHandler(UserException e) {
log.error("[exceptionHandler] ex", e);
ErrorResult errorResult = new ErrorResult("USER-EX", e.getMessage());
return new ResponseEntity(errorResult, HttpStatus.BAD_REQUEST);
}
@ResponseStatus(HttpStatus.INTERNAL_SERVER_ERROR)
@ExceptionHandler
public ErrorResult exHandler(Exception e) {
log.error("[exceptionHandler] ex", e);
return new ErrorResult("EX", "내부 오류");
}
... 중략
|
cs |
다양한 반환값 지정가능
@ExceptionHandler는 ErrorResult, ResponseEntity 뿐만 아니라 View, String 등 여러가지 거의 모든 반환값을 처리할 수 있도록 구성되어 있다. 상황에 따라 @RestController가 아닌 @Controller로만 바꿔주면 된다.
4. @ControllerAdvice - @RestControllerAdvice
@ExceptionHandler를 사용하면 좋지만, 하나의 컨트롤러에 정상흐름 처리 코드와 예외 처리 코드가 혼재되어 있는 형태가 되었다. @ControllerAdvice를 사용하면 이 두 종류의 코드를 분리할 수 있고, 예외 처리 코드를 글로벌 또는 특정 위치에만 적용시킬 수 있다.
사용법은 매우 간단하다. 예외 처리 코드를 모두 잘라와서, 새로 만든 컨트롤러 파일에 붙여넣는다. 그리고 @RestControllerAdvice 어노테이션만 추가해주면 된다.
java/hello/exception/exhandler/advice/ExControllerAdvice.java
|
1
2
3
4
5
6
7
8
9
10
11
12
13
14
15
16
17
18
19
20
21
22
23
24
25
26
27
|
@Slf4j
@RestControllerAdvice
public class ExControllerAdvice {
@ExceptionHandler(IllegalArgumentException.class)
@ResponseStatus(HttpStatus.BAD_REQUEST)
public ErrorResult illegalExHandler(IllegalArgumentException e) {
log.error("[exceptionHandler] ex", e);
return new ErrorResult("BAD", e.getMessage());
}
@ExceptionHandler
public ResponseEntity<ErrorResult> userExHandler(UserException e) {
log.error("[exceptionHandler] ex", e);
ErrorResult errorResult = new ErrorResult("USER-EX", e.getMessage());
return new ResponseEntity(errorResult, HttpStatus.BAD_REQUEST);
}
@ResponseStatus(HttpStatus.INTERNAL_SERVER_ERROR)
@ExceptionHandler
public ErrorResult exHandler(Exception e) {
log.error("[exceptionHandler] ex", e);
return new ErrorResult("EX", "내부 오류");
}
}
|
cs |
대상 컨트롤러 지정
위에서와 같이, @RestControllerAdvice에 아무것도 지정해주지 않으면 모든 컨트롤러에 글로벌 적용된다.
@ControllerAdvice(annotations = RestController.class)
: annotations 속성을 주면, 특정 클래스의 컨트롤러에만 적용이 가능하다.
@ControllerAdvice("org.example.controllers")
: 특정 경로의 컨트롤러에만 적용 가능하다.
@ControllerAdvice(assignableTypes = {ControllerInterface.class, AbstractController.class})
: 특정 컨트롤러에만 적용되도록 지정해줄 수 있다.
참조
1. 인프런_스프링 MVC 2편 - 백엔드 웹개발 핵심 기술_김영한 님 강의
https://www.inflearn.com/course/%EC%8A%A4%ED%94%84%EB%A7%81-mvc-2
'Programming-[Backend] > Spring' 카테고리의 다른 글
| [스프링 웹MVC-2] 19. 타입 컨버터 - Formatter (0) | 2021.09.19 |
|---|---|
| [스프링 웹MVC-2] 18. 타입 컨버터 - ConversionService (2) | 2021.09.15 |
| [스프링 웹MVC-2] 16. API 예외 처리 - 스프링부트 기본 오류 처리, HandlerExceptionResolver (0) | 2021.09.09 |
| [스프링 웹MVC-2] 15. 예외 - 인터셉터와 스프링 부트의 오류 페이지 (0) | 2021.09.08 |
| [스프링 웹MVC-2] 14. 예외 - 서블릿 오류 페이지 (0) | 2021.09.06 |


