Querydsl 왜 쓸까?
1. 문법이 sql문과 거의 유사하기 때문에 배우기 쉽고 간결하다. 자바처럼 프로퍼티 탐색('.' 찍기)으로 문법 검색이 가능하다.
2. JPQL의 String으로 작성하는 sql문에 비해서, querydsl의 문법은 자바의 문법을 차용하기 때문에 Compile 시점에 미리 에러를 잡아준다. (전체 파일이 실행되기 전에 문제가 있으면 바로 알려준다.)
3. 검색 조건 등 복잡하고 동적인 쿼리를 가능하게 해준다. 물론 한계가 있어서 통계성 쿼리 등은 natvie 쿼리 등으로 해결해야한다.
1. 프로젝트 생성 및 환경 설정
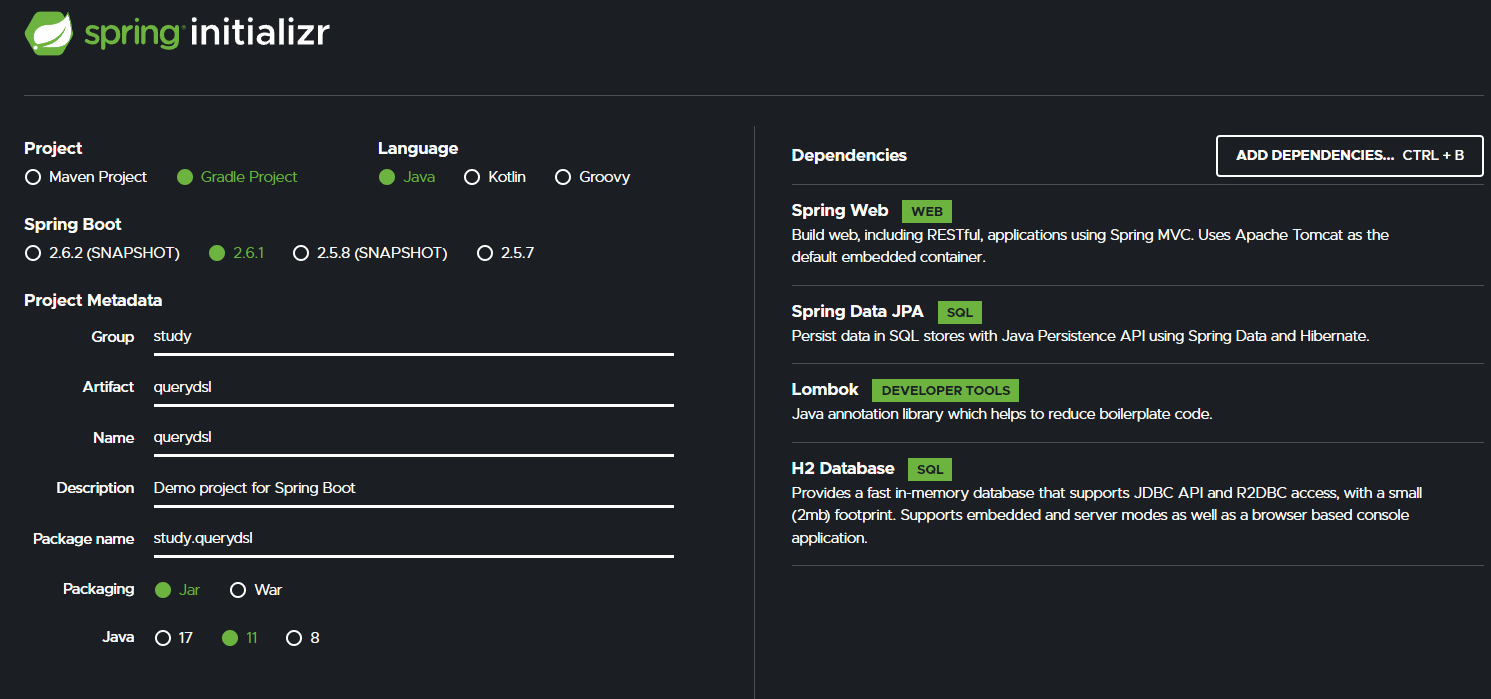
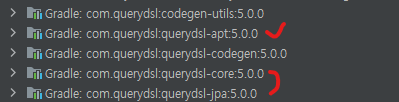
스타터에 querydsl은 없다. 그림상에 있는 dependencies들만 추가하여 프로젝트를 생성한다.
springBoot가 querydsl의 버전을 관리해주고는 있지만, spring Initializr에서 querydsl 의존성을 추가할 수는 없다. 따라서 환경설정 build.gradle 파일에 아래 코드들을 추가한다.
|
1
2
3
4
5
6
7
8
9
10
11
12
13
14
15
16
17
18
19
20
21
22
23
24
25
26
27
28
29
30
31
32
33
34
35
36
37
38
39
40
41
42
43
44
45
46
47
48
49
50
51
52
53
54
55
56
57
58
59
60
61
62
63
64
65
66
|
buildscript {
ext {
queryDslVersion = "5.0.0"
}
}
plugins {
id 'org.springframework.boot' version '2.6.0'
id 'io.spring.dependency-management' version '1.0.11.RELEASE'
//querydsl 추가
id "com.ewerk.gradle.plugins.querydsl" version "1.0.10"
id 'java'
}
group = 'study'
version = '0.0.1-SNAPSHOT'
sourceCompatibility = '11'
configurations {
compileOnly {
extendsFrom annotationProcessor
}
}
repositories {
mavenCentral()
}
dependencies {
implementation 'org.springframework.boot:spring-boot-starter-data-jpa'
implementation 'org.springframework.boot:spring-boot-starter-web'
compileOnly 'org.projectlombok:lombok'
runtimeOnly 'com.h2database:h2'
//querydsl 추가
implementation "com.querydsl:querydsl-jpa:${queryDslVersion}"
implementation "com.querydsl:querydsl-apt:${queryDslVersion}"
annotationProcessor 'org.projectlombok:lombok'
testImplementation 'org.springframework.boot:spring-boot-starter-test'
}
test {
useJUnitPlatform()
}
//querydsl 추가 시작
def querydslDir = "$buildDir/generated/querydsl"
querydsl {
jpa = true
querydslSourcesDir = querydslDir
}
sourceSets {
main.java.srcDir querydslDir
}
compileQuerydsl{
options.annotationProcessorPath = configurations.querydsl
}
configurations {
compileOnly {
extendsFrom annotationProcessor
}
querydsl.extendsFrom compileClasspath
}
//querydsl 추가 끝
|
cs |
querydsl 설정은 버전마다, 그리고 어떤 모듈이나 IDE를 사용하느냐에 따라 달라질 수 있다고 한다. 추후에는 이 설정을 어떻게 하는지 구글링을 하고, 설정 방법을 익혀야할 것 같다.
컴파일 테스트
그리고 테스트를 위해 Hello 클래스를 추가해본다.
|
1
2
3
4
5
6
7
8
9
|
@Entity
@Getter
@Setter
public class Hello {
@Id
@GeneratedValue
private Long id;
}
|
cs |
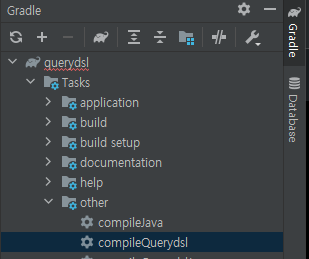
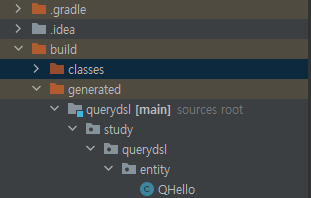
또한 우상단의 gradle 탭에서 Tasks -> other -> compileQuerydsl을 누르면
build/generated/.../QHello 객체가 생성된 것을 확인할 수 있다. 이것은 상단 환경설정 부분에서
def querydslDir = "$buildDir/generated/querydsl"
라고 Q객체가 생성되는 루트를 설정해줬기 때문이다.
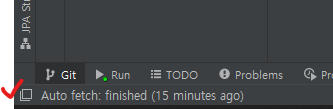
혹시 화면 우상단 탭이 보이지 않는다면, intelliJ의 화면 제일 좌측하단에서 아래 버튼을 눌러주면 보인다. 그래도 안보인다면 intelliJ를 껐다 켜야한다.
build 폴더는 gradle에 의해 gitignore 처리된다.
Qfile 등은 시스템이 자동으로 만들어주는 형태이고, 버전마다 조금씩 달라질 수 있기 때문에 git으로 형상관리를 하지는 않는다. 혹시나 src/main/generated에 들어가게 된다면, 해당 파일들은 gitignore 해줘야함도 기억하자.
2. querydsl 기본 동작 테스트
상세한 내용은 뒤에서 다룰 것이다. 기본적으로 Q객체를 불러와서 sql을 작성하듯이 querydsl 문을 작성한다.
현재로서는 JPAQueryFactory를 사용하는 방식을 권장한다. 여기에 EntityManager를 파라미터로 전달하여 query문을 작성할 수 있는 상태가 된다.
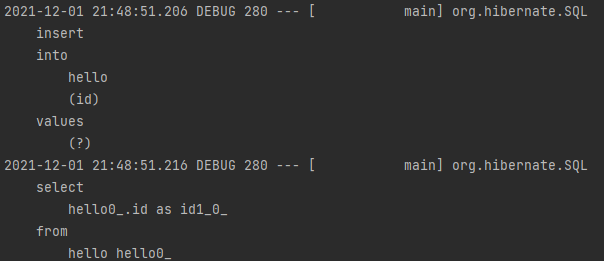
만들어두었던 Hello 객체를 조회하기 위해서 QHello 객체에 접근한다. 주석문과 같이 QHello 객체를 생성자를 통해 만들 수도 있지만, QHello 객체에서 static으로 만들어둔 QHello.hello를 사용해도 된다.
|
1
2
3
4
5
6
7
8
9
10
11
12
13
14
15
16
17
18
19
20
21
22
23
24
25
|
|
@SpringBootTest
@Transactional
class QuerydslApplicationTests {
@Autowired
EntityManager em;
@Test
void contextLoads() {
Hello hello = new Hello();
em.persist(hello);
JPAQueryFactory query = new JPAQueryFactory(em);
// QHello qHello = new QHello("h");
QHello qHello = QHello.hello;
Hello result = query
.selectFrom(qHello)
.fetchOne();
assertThat(result).isEqualTo(hello);
assertThat(result.getId()).isEqualTo(hello.getId());
}
}
|
cs |
3. 라이브러리 살펴보기
apt 라는 부분이 코드 생성과 관련된 라이브러리라고 한다. QHello 등의 객체를 만들어주는 역할을 한다. core, jpa 부분은 실제 querydsl의 코드를 작동하게 해주는, 위 예시에서 selectFrom.fetchOne 등의 작동을 담당하는 라이브러리라고 한다.
4. application.yml 설정
DB와 JPA등의 설정을 한다. JPA 강의에서와 거의 같다.
|
1
2
3
4
5
6
7
8
9
10
11
12
13
14
15
16
17
18
|
spring:
datasource:
url: jdbc:h2:tcp://localhost/~/querydsl
username: sa
password:
driver-class-name: org.h2.Driver
jpa:
hibernate:
ddl-auto: create
properties:
hibernate:
# show_sql: true
format_sql: true
logging.level:
org.hibernate.SQL: debug
# org.hibernate.type: trace
|
cs |
p6spy 추가
JPA 강의에서 배운 것과 같이, sql문의 파라미터 출력 및 기타 기능들을 위해서 p6spy 라이브러리를 추가한다.
implementation 'com.github.gavlyukovskiy:p6spy-spring-boot-starter:1.5.8'
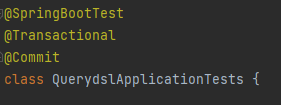
@Commit
설정을 마치고 테스트를 실행하면, H2 database에서 hello 테이블이 생성되는 것을 확인할 수 있다. 여기에 들어간 데이터까지 확인하고 싶다면 @Commit 어노테이션을 붙여주면 된다. 기본적으로 테스트에 @Transactional을 넣어주면 자동으로 롤백이 되는데, @Commit 어노테이션을 넣어주면 롤백이 되지 않는다.
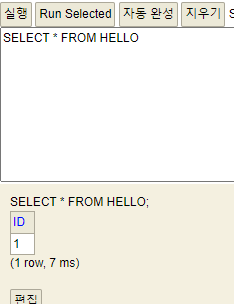
sql 전달
database
5. 예제 도메인
JPA 강의에서와 똑같이 member와 team 도메인을 만든다. 코드를 복사해도 되는데, 복습상 다시 작성해보자!
Member.class
|
1
2
3
4
5
6
7
8
9
10
11
12
13
14
15
16
17
18
19
20
21
22
23
24
25
26
27
28
29
30
31
32
33
34
35
36
37
38
39
40
41
|
java
@Entity
@Getter
@Setter
@Table(name = "member")
@NoArgsConstructor(access = AccessLevel.PROTECTED)
@ToString(of={"id", "username", "age"})
public class Member {
@Id
@GeneratedValue
@Column(name = "member_id")
private Long id;
private String username;
private int age;
@ManyToOne(fetch = FetchType.LAZY)
@JoinColumn(name = "team_id")
private Team team;
public Member(String username) {
this(username,0,null);
}
public Member(String username, int age) {
this(username, age, null);
}
public Member(String username, int age, Team team) {
this.username = username;
this.age = age;
if (team != null) {
changeTeam(team);
}
}
public void changeTeam(Team team) {
this.team = team;
team.getMembers().add(this);
}
}
|
cs |
Team.class
|
1
2
3
4
5
6
7
8
9
10
11
12
13
14
15
16
17
18
19
20
21
22
23
|
@Entity
@Table(name = "team")
@Getter
@Setter
@NoArgsConstructor(access = AccessLevel.PROTECTED)
@ToString(of={"id", "name"})
public class Team {
@Id
@GeneratedValue
@Column(name = "team_id")
private Long id;
private String name;
@OneToMany(mappedBy = "team")
private List<Member> members = new ArrayList<>();
public Team(String name) {
this.name = name;
}
}
|
cs |
참조
1. 인프런_실전! Querydsl_김영한 님 강의
https://www.inflearn.com/course/Querydsl-%EC%8B%A4%EC%A0%84/dashboard
'Programming-[Backend] > JPA' 카테고리의 다른 글
| [Querydsl]3. 기본 문법 - 서브쿼리, Case, 상수 문자 더하기 (0) | 2021.12.05 |
|---|---|
| [Querydsl]2. 기본 문법 (0) | 2021.12.03 |
| [spring data JPA]4. 구현체 분석, 기타 기능 : Specification, Query by Example, Projections, Native query (0) | 2021.11.21 |
| [spring data JPA] 3. 확장 : Auditing, Paging - @CreatedAt, @PageableDefault 등 (0) | 2021.11.21 |
| [spring data JPA] 2. 페이징과 정렬, 벌크 연산 @EntityGraph, JPA Hint Lock (0) | 2021.11.20 |


