1. BootStrap 추가
디자인을 수정하기 위해서 BootStrap을 추가한다. django에는 Django-Bootstrap4 라는 전용 라이브러리가 있다. 아래 링크에서 확인할 수 있다.
https://django-bootstrap4.readthedocs.io/en/latest/index.html
우선 설치를 위해서 Installation 페이지에 적혀있는대로 아래 명령어를 터미널에 입력한다.
pip install django-bootstrap4
그리고 설치가 됬다는 것을 알려주기 위해 settings.py의 INSTALLED_APPS에 bootstrap4를 추가한다.
INSTALLED_APPS = [
    'django.contrib.admin',
    'django.contrib.auth',
    'django.contrib.contenttypes',
    'django.contrib.sessions',
    'django.contrib.messages',
    'django.contrib.staticfiles',
    'accountapp',
    'bootstrap4',
]
QuickStart 페이지에서 {% load bootstrap4 %}, {% bootstrap_from from %} 등의 태그를 확인할 수 있다. 이를 참고하여 아래와 같이 html, css를 수정해본다.
login.html
{% load bootstrap4 %} 구문과 {% bootstrap_from from %} 구문을 적용하였다. 이외에, submit 버튼의 class명도 수정하였다. 여기서 bootstrap 문법을 살펴보자. col-6는 너비를 의미하는데, col-12가 부모 객체의 최대 너비를 의미한다. mt-3는 margin-top의 약자로, 3은 기존 margin의 3배를 하겠다는 의미가 된다.
{% extends 'base.html' %}
{% load bootstrap4 %}

{% block content %}
    <div style="text-align: center; max-width: 500px; margin: 4rem auto">
        <div>
            <h4>Login</h4>
        </div>
        <div>
            <form action="{% url 'accountapp:login' %}" method="post">
                {% csrf_token %}
{#                {{ form }}#}
                {% bootstrap_form form %}
                <input type="submit" class="btn btn-dark rounded-pill col-6 mt-3"/>
            </form>
        </div>
    </div>
{% endblock %}
create.html
{% load bootstrap %}, {% bootstrap_form from %}을 적용한다.
{%  extends 'base.html' %}
{% load bootstrap4 %}

{% block content %}
    <div style="text-align: center; max-width: 500px; margin: 4rem auto">
        <form action="{% url 'accountapp:create' %}" method="post">
            {%  csrf_token %}
            {% bootstrap_form form %}
            <input type="submit" class="btn btn-dark rounded-pill col-6 mt-3">
        </form>
    </div>
{% endblock %}

나눔 글꼴 설치
본문의 내용을 네이버 나눔 글꼴로 적용해보면서 .otf 파일을 적용하는 방법에 대해서도 배운다. 나눔글꼴 페이지에 들어가서 나눔스퀘어 글꼴을 다운로드 받자.

그리고 일부 .otf 파일을 static/fonts 폴더에 넣는다.

그리고 head.html 파일에 다음 코드를 추가한다.
<style>
    @font-face {
        font-family: 'NanumSquareR';
        src: local('NanumSqureR'),
        url("{% static 'fonts/NanumSquareR.otf' %}") format("opentype");
    }
    @font-face {
        font-family: 'NanumSquareEB';
        src: local('NanumSqureEB'),
        url("{% static 'fonts/NanumSquareEB.otf' %}") format("opentype");
    }
    @font-face {
        font-family: 'NanumSquareB';
        src: local('NanumSqureB'),
        url("{% static 'fonts/NanumSquareB.otf' %}") format("opentype");
    }
    @font-face {
        font-family: 'NanumSquareL';
        src: local('NanumSqureL'),
        url("{% static 'fonts/NanumSquareL.otf' %}") format("opentype");
    }
</style>
그러면 base.html 파일의 body에 style을 적용할 수 있게 된다.
<!DOCTYPE html>
<html lang="ko">
{% include 'head.html' %}
<body style="font-family: 'NanumSquareR'">
2. DetailView 구현
views.py
사용자가 로그인 시에 profile을 조회할 수 있는 detailView를 CBV로 작성한다. createView와 거의 유사하다. 다만 POST가 아니라 GET이기 때문에 제출할 form을 결정하는 form_class 라던가, 성공시 redirect를 지정하는 sueccess_url 속성으 필요하지 않다.
class AccountDetailView(DetailView):
    model = User
    context_object_name = 'target_user'
    template_name = 'accoutnapp/detail.html'
view를 작성하고나면, template과 route(url)을 해줘야함을 이제 알 수 있다.
detail.html
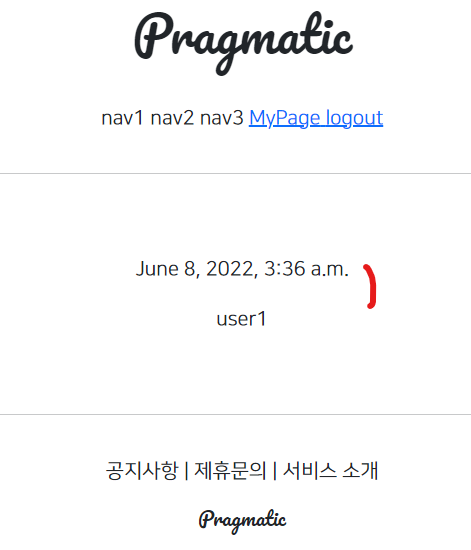
user 모델로부터 date_joined, username값을 가져와서 렌더링해준다.
{% extends 'base.html' %}
{% load bootstrap4 %}

{% block content %}
    <div style="text-align: center; max-width: 500px; margin: 4rem auto">
        <p>
            {{ target_user.date_joined }}
        </p>
        <p>
            {{ target_user.username }}
        </p>
    </div>
{% endblock %}
urls.py
다른 것과 유사하지만, 여기서는 url path에 사용자의 id 정보(정확하게는 primary key)가 담겨야 하므로 <int:pk> 를 추가해준다.
path('detail/<int:pk>', AccountDetailView.as_view(), name='detail')
header.html
메인페이지에서 detail에 접근할 수 있도록 링크를 추가해준다. detail을 볼 수 있는 것은 사용자가 로그인 했을 때이므로 if문 내에 작성해준다.
...생략
{% if not user.is_authenticated %}
    <a href="{% url 'accountapp:login' %}?next={{ request.path }}">
        <span>login</span>
    </a>
{% else %}
    <a href="{% url 'accountapp:detail' pk=user.pk %}">
        <span>MyPage</span>
    </a>
...생략


3. TargetUser 변경
detail 페이지에서 user의 정보를 불러왔다. 그런데 이 user라는 model은 로그인한 사용자의 정보이다. 이것은 원래 페이지의 기획 의도인 다른 사용자의 정보를 볼 수 있는 것과 일치하지 않는 개념이므로 user model을 다른 값으로 변경해주어야 한다.
context_object_name 값을 detailView에서 받아와서 'target_user'라는 값으로 표기해준다.
class AccountDetailView(DetailView):
    model = User
    context_object_name = 'target_user'
    template_name = 'accountapp/detail.html'
이제 detail.html 페이지에 이 target_user에 대한 값을 표시하도록 변경해주면 다른 사람의 profile을 조회할 수 있는 view가 완성된다.
<p>
    {{ target_user.date_joined }}
</p>
<p>
    {{ target_user.username }}
</p>
참조
1. 작정하고 장고! Django로 Pinterest 따라만들기 : 바닥부터 배포까지-박형석님 인프런 강의
'Programming-[Backend] > Django' 카테고리의 다른 글
| Django로 Pinterest 따라 만들기-8. Authentication, Decorator 활용, superuser 및 media 설정 (0) | 2022.06.09 |
|---|---|
| Django로 Pinterest 따라 만들기-7. Update, DeleteView 구현 (1) | 2022.06.09 |
| Django로 Pinterest 따라 만들기-5. AccountApp : CBV, CreateView, Login, reverse_lazy (0) | 2022.06.08 |
| Django로 Pinterest 따라 만들기-4. Model 생성, HTTP 통신 연습, Run Configuration 설정 (0) | 2022.06.07 |
| Django로 Pinterest 따라 만들기-3. static, CSS 설정 (0) | 2022.06.07 |


