코루틴
제너레이터 개념 되짚기
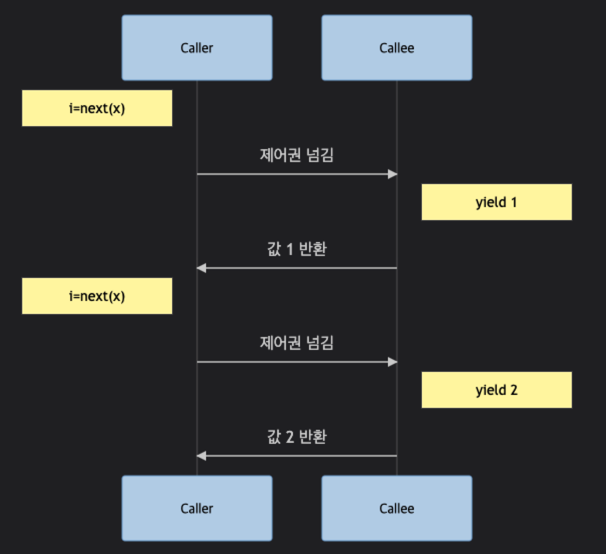
참조2의 예제를 참고하여 제너레이터의 caller - callee 개념을 이해하고나서 코루틴에 대해서 알아본다.
callee 제너레이터를 호출하는 곳이 caller라고 보면, caller에서 next()로 callee를 호출할 때마다 아래 그림과 같은 과정이 진행된다. 여기서 유의할 점은 caller는 callee를 항상 호출하고 callee는 일방적으로 데이터를 caller에게 전달해주는 역할만 한다는 점이다. 이것이 일반적인 제너레이터의 개념이다.
def callee():
    yield 1
    yield 2

x = callee()
i = next(x)
i = next(x)

코루틴 개념
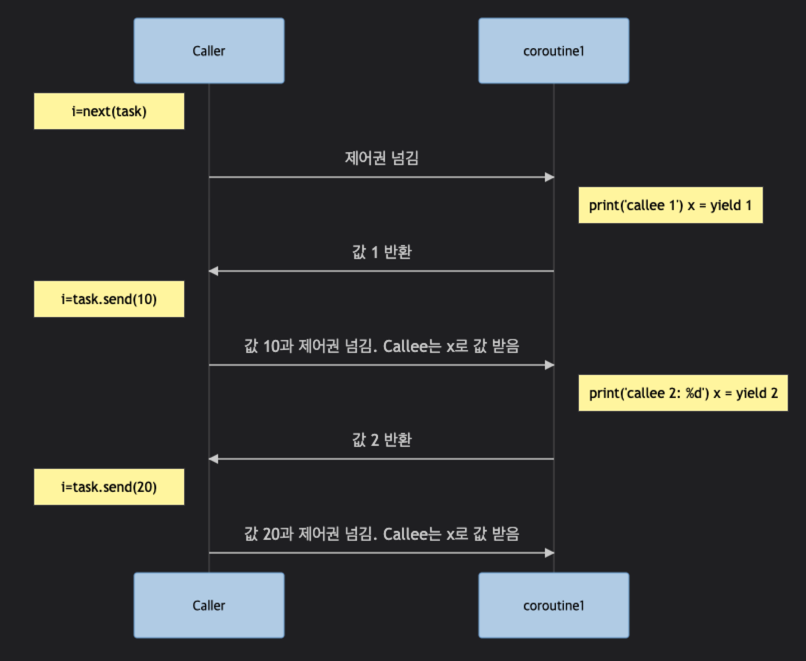
위와 다르게 코루틴은 메인 루틴인 caller가 서브 루틴인 callee에게 데이터를 전달할 수 있는 개념이다. send() 메서드를 통해서 값을 전달할 수 있다. 이외에 throw(type, value, traceback)을 통해서 yield 이후 멈춰있는 callee에 exception을 전달할 수도 있고, close()를 통해서 callee를 종료시킬 수도 있다.
여기서 유의할 점은 코루틴은 반드시 최초에는 next()를 호출해야 한다는 것이다. send()부터 시작할 수는 없다.
def coroutine1():
    print('callee 1')
    x = yield 1
    print('callee 2: %d' % x)
    x = yield 2
    print('callee 3: %d' % x)

task = coroutine1()
i = next(task)    # callee 1 출력, i는 1이 됨
i = task.send(10) # callee 2: 10 출력, i는 2가 됨
task.send(20)     # callee 3: 20 출력 후 StopIteration exception 발생
예시로 확실히 이해
변수 = yield 구문
coroutine2에 10을 넣고 next를 호출하면 첫번째 print문과 yield x 까지만 실행된다. 따라서 메인루틴(caller) 쪽으로 10이 전달되어 print(next(cr3)) = print(10)이 되므로 10까지 출력되고 코루틴은 멈춰있게 된다. 다음으로 cr3.send(30)으로 코루틴에 값을 전달하면 등호(=) 기준 왼쪽에 있는 y에서 그값을 받는다. 그리고 yield까지만 실행되므로 코루틴 내부의 두번째 print문이 실행된다. yield x + y를 실행하므로 caller에게 10 + 30의 값을 반환하여 40이 출력된다. 마지막으로 cr3.send(100)을 호출하면 코루틴은 z = 100으로 값을 받고 print문을 출력한다. 이후 yield문이 없으므로 stopIteration이 발생하는 것이다.
y = yield x와 같이 작성되어 있으면, 코루틴은 오른쪽 yield항 까지만 실행하고 멈춰있고, 그 다음 send 구문에서 왼쪽항의 값을 받아오는 원리라고 할 수 있다.
def coroutine2(x):
    print('>>> coroutine started : {}'.format(x))
    y = yield x
    print('>>> coroutine received : {}'.format(y))
    z = yield x + y
    print('>>> coroutine received : {}'.format(z))

# coroutine2(x)에서의 x는 제너레이터 초기화 값을 의마한다.
cr3 = coroutine2(10)
print(next(cr3))
'''
>>> coroutine started : 10
10
'''
print(cr3.send(30))
'''
>>> coroutine received : 30
40
'''
cr3.send(100)
'''
>>> coroutine received : 100
StopIteration
'''
중첩된 코루틴, list()
코루틴이 중첩되어있으면 그냥 차례대로 하나씩 실행한다. yield가 있으면 next() 호출시마다 중간중간에 멈춰있는 다는 것을 기억하면 된다. 그리고 list()로 호출하면 코루틴 전체에 대해 next()로 모든 값을 호출하여 list화 한다.
# 중첩 코루틴 처리
def generator1():
    for x in 'AB':
        yield x
    for y in range(1, 4):
        yield y

t1 = generator1()
print(next(t1)) #A
print(next(t1)) #B
print(next(t1)) #1
print(next(t1)) #2

t2 = generator1()
print(list(generator1())) #['A', 'B', 1, 2, 3]
yield from
위 예제와 비슷하다. 다만 yield from을 통해 좀 더 깔끔하게 반복문 형태로 만들 수 있다.
#yield from
def generator2():
    yield from 'AB'
    yield from range(1, 4)

t3 = generator2()
추가 : 코루틴 상태
코루틴은 다음 4가지의 상태를 가질 수 있다. GEN_CREATED, GEN_RUNNING, GEN_SUSPENDED, GEN_CLOSED
from inspect import getgeneratorstate

# GEN_CREATED : 처음 대기 상태
# GEN_RUNNING : 실행 상태
# GEN SUSPENDED : Yield 대기 상태
# GEN_CLOSED : 실행 완료 상태


cr3 = coroutine2(10)
print(getgeneratorstate(cr3))
print(next(cr3))
print(getgeneratorstate(cr3))
print(cr3.send(30))

'''
GEN_CREATED
>>> coroutine started : 10
10
GEN_SUSPENDED
>>> coroutine received : 30
40
'''
참조
1. 인프런 강의 - 우리를 위한 프로그래밍 : 파이썬 중급 (Inflearn Original)
2. All about IOT - Python 비동기 프로그래밍 제대로 이해하기(1/2) - Asyncio, Coroutine
https://blog.humminglab.io/posts/python-coroutine-programming-1/#exception-%EC%B2%98%EB%A6%AC
'Programming-[Backend] > Python' 카테고리의 다른 글
| 파이썬 중급 - 10. 멀티 스크래핑 실습 : asyncio, beautifulsoup (0) | 2022.07.31 |
|---|---|
| 파이썬 중급 - 9. 동시성과 병렬성 : Futures (0) | 2022.07.31 |
| 파이썬 중급 - 7. 병행성 흐름: iter, hasattr, isinstance, stopIteration, Yield, itertools (0) | 2022.07.23 |
| 파이썬 중급 - 6. 고위 함수(Higher Order Function), 클로저(Closure) 기본 (0) | 2022.07.19 |
| 파이썬 중급 - 5. 고위 함수(Higher Order Function), 클로저(Closure) 기본 (0) | 2022.07.17 |
