1. 타임리프 기능 살펴보기 - 이전 글에 이어서
반복
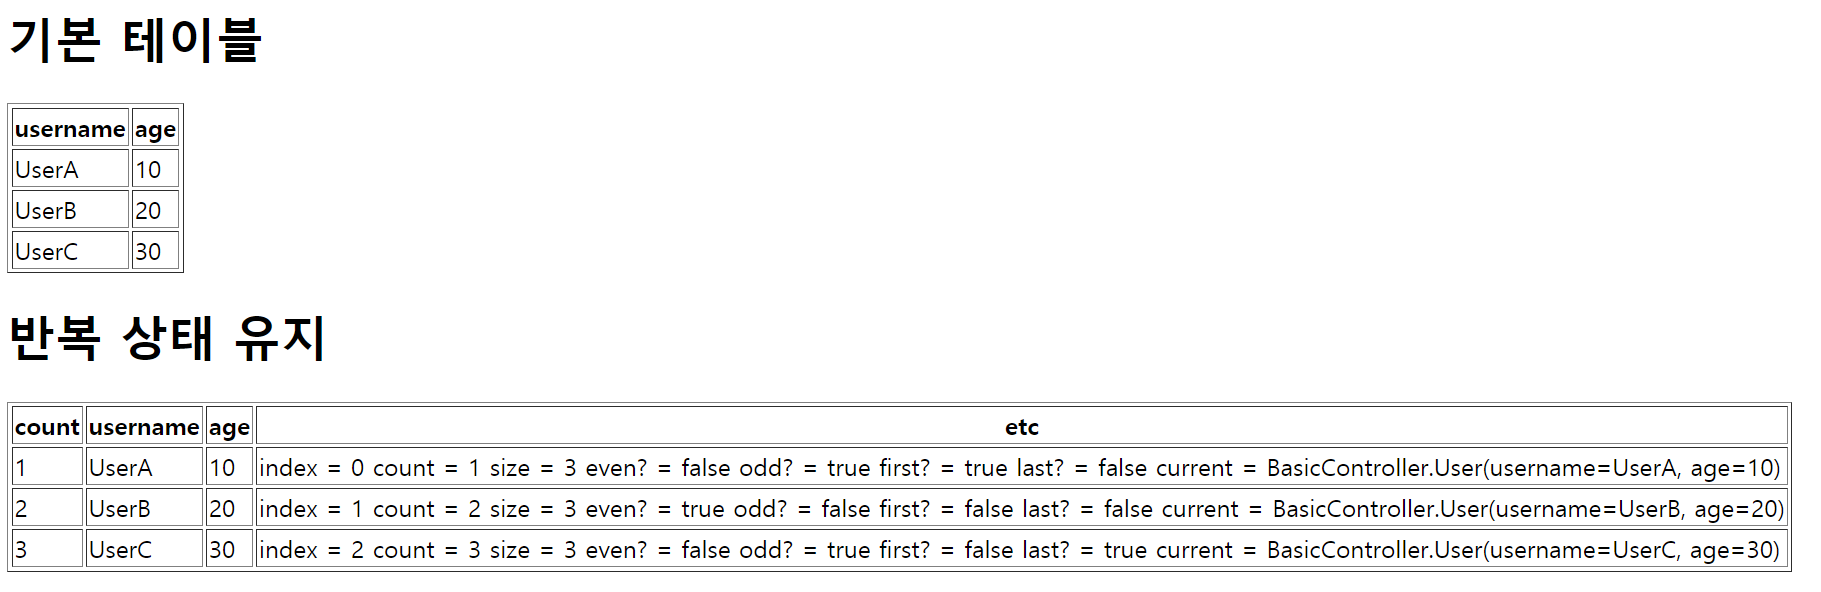
반복 기능은 반복적으로 데이터를 렌더링 해준다. 아래 코드와 같이 th:each="파라미터1, 파라미터2 : ${반복객체}" 로 표현한다. 파라미터1은 반복 객체 속의 각 객체를 의미하고, 파라미터2는 각 객체의 상태값을 표현한다. 파라미터1의 이름이 user인 경우 파라미터2의 이름은 userStat으로 자동지정되어 파라미터2는 생략해도 정상 동작한다. 표현할 수 있는 상태값은 코드에 나와 있는 것과 같으며, current는 현재 반복 index의 각 객체를 표시한다. 결과 화면을 참고하자.
예시를 위해서 addUsers 메서드를 추가했다. 반복 기능의 경우 예시문의 List 뿐만 아니라, java.util.Iteration, java.util.Enumeration을 구현한 모든 객체 및 Map을 사용할 수 있으며 Map의 경우 파라미터1에 담기는 값은 Map.Entry가 된다.
java/hello/thymeleaf/basic/BasicController.java
| 1 2 3 4 5 6 7 8 9 10 11 12 13 14 15 16 17 18 |
@GetMapping("/each") public String each(Model model) { addUsers(model); return "basic/each"; } private void addUsers(Model model) { List<User> list = new ArrayList<>(); list.add(new User("UserA", 10)); list.add(new User("UserB", 20)); list.add(new User("UserC", 30)); model.addAttribute("users", list); } ... Colored by Color Scripter |
cs |
resources/templates/basic/each.html
| 1 2 3 4 5 6 7 8 9 10 11 12 13 14 15 16 17 18 19 20 21 22 23 24 25 26 27 28 29 30 31 32 33 34 35 36 37 38 39 40 41 42 43 44 45 46 47 48 49 50 51 52 |
<!DOCTYPE html> <html xmlns:th="http://www.thymeleaf.org"> <head> <meta charset="UTF-8"> <title>Title</title> </head> <body> <h1>기본 테이블</h1> <table border="1"> <tr> <th>username</th> <th>age</th> </tr> <tr th:each="user : ${users}"> <td th:text="${user.username}">username</td> <td th:text="${user.age}">0</td> </tr> </table> <h1>반복 상태 유지</h1> <table border="1"> <tr> <th>count</th> <th>username</th> <th>age</th> <th>etc</th> </tr> <tr th:each="user, userStat : ${users}"> <td th:text="${userStat.count}">username</td> <td th:text="${user.username}">username</td> <td th:text="${user.age}">0</td> <td> index = <span th:text="${userStat.index}"></span> count = <span th:text="${userStat.count}"></span> size = <span th:text="${userStat.size}"></span> even? = <span th:text="${userStat.even}"></span> odd? = <span th:text="${userStat.odd}"></span> first? = <span th:text="${userStat.first}"></span> last? = <span th:text="${userStat.last}"></span> current = <span th:text="${userStat.current}"></span> </td> </tr> </table> </body> </html> Colored by Color Scripter |
cs |
결과화면
조건
th:if, th:unless, th:switch - th:case 구문을 사용할 수 있다. 조건문은 조건에 맞지 않으면 해당 속성이 있는 태그 자체를 렌더링하지 않는다. 그리고 switch 문에서 * 표기는 조건이 만족하지 않을 때 사용할 수 있는 default 값이다.
java/hello/thymeleaf/basic/BasicController.java
resources/templates/basic/condition.html
| 1 2 3 4 5 6 7 8 9 10 11 12 13 14 15 16 17 18 19 20 21 22 23 24 25 26 27 28 29 30 31 32 33 34 35 36 37 38 39 40 41 42 43 44 45 |
<!DOCTYPE html> <html xmlns:th="http://www.thymeleaf.org"> <head> <meta charset="UTF-8"> <title>Title</title> </head> <body> <h1>if, unless</h1> <table border="1"> <tr> <th>count</th> <th>username</th> <th>age</th> </tr> <tr th:each="user, userStat : ${users}"> <td th:text="${userStat.count}">1</td> <td th:text="${user.username}">username</td> <td> <span th:text="${user.age}">0</span> <span th:text="'미성년자'" th:if="${user.age lt 20}"></span> <span th:text="'미성년자'" th:unless="${user.age ge 20}"></span> </td> </tr> </table> <h1>switch</h1> <table border="1"> <tr> <th>count</th> <th>username</th> <th>age</th> </tr> <tr th:each="user, userStat : ${users}"> <td th:text="${userStat.count}">1</td> <td th:text="${user.username}">username</td> <td th:switch="${user.age}"> <span th:case="10">10살</span> <span th:case="20">20살</span> <span th:case="*">기타</span> </td> </tr> </table> </body> </html> Colored by Color Scripter |
cs |
주석
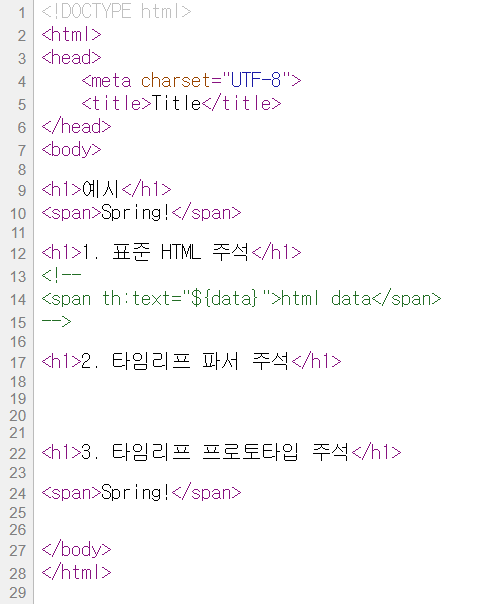
HTML 표준 주석은 <!-- -->로 한다. 이 경우에 브라우저는 렌더링을 하지 않는다. 이 경우에는 타임리프의 코드가 주석화되어 페이지 소스 보기 화면에서 출력되게 된다.
타임리프 파서 주석을 적용하면, 타임리프 자체에서도 주석 처리를 한다. 그래서 페이지 소스 보기 화면에서 타임리프 코드도 보이지 않게 된다.
타임리프 프로토타입 주석은 HTML 파일로 열때는 렌더링이 되지 않지만, 타임리프 view를 거쳐서 렌더링은 되는 주석 방식이다.
java/hello/thymeleaf/basic/BasicController.java
| 1 2 3 4 5 |
@GetMapping("/condition") public String condition(Model model) { addUsers(model); return "basic/condition"; } Colored by Color Scripter |
cs |
resources/templates/basic/comments.html
| 1 2 3 4 5 6 7 8 9 10 11 12 13 14 15 16 17 18 19 20 21 22 23 24 25 26 27 28 29 30 31 32 33 34 35 36 |
<!DOCTYPE html> <html xmlns:th="http://www.thymeleaf.org"> <head> <meta charset="UTF-8"> <title>Title</title> </head> <body> <h1>예시</h1> <span th:text="${data}">html data</span> <h1>1. 표준 HTML 주석</h1> <!-- <span th:text="${data}">html data</span> --> <h1>2. 타임리프 파서 주석</h1> <!--/* [[${data}]] */--> <!--/*--> <span th:text="${data}">html data</span> <!--*/--> <h1>3. 타임리프 프로토타입 주석</h1> <!--/*/ <span th:text="${data}">html data</span> /*/--> </body> </html> Colored by Color Scripter |
cs |
페이지 소스 보기
블록
블록은 HTML 태그에 속성을 주는 방식이 아니라, 유일하게 직접 타임리프 전용 태그를 지정하는 방식이다. 아래 HTML 코드에서 <th:block> 태그 안에 <div> 태그가 2개 존재하여 th:each에 의해 반복적으로 구현되도록 만들었다. 이렇게 여러 개의 HTML 태그에 타임리프 문법을 한번에 적용하기 위해 사용하는 것이 타임리프 블록 태그이다. 만약 이런 방식이 지원되지 않는다면, 2개의 각 <div> 태그에 같은 th:each 속성을 반복적으로 적용해야할 것이다.
<th:block> 코드는 렌더링 시 삭제된다.
java/hello/thymeleaf/basic/BasicController.java
| 1 2 3 4 5 |
@GetMapping("/block") public String block(Model model) { addUsers(model); return "basic/block"; } Colored by Color Scripter |
cs |
resources/templates/basic/block.html
| 1 2 3 4 5 6 7 8 9 10 11 12 13 14 15 16 17 18 19 20 |
<!DOCTYPE html> <html xmlns:th="http://www.thymeleaf.org"> <head> <meta charset="UTF-8"> <title>Title</title> </head> <body> <th:block th:each="user : ${users}"> <div> 사용자 이름1 <span th:text="${user.username}"></span> 사용자 나이1 <span th:text="${user.age}"></span> </div> <div> 요약 <span th:text="${user.username} + ' / ' + ${user.age}"></span> </div> </th:block> </body> </html> Colored by Color Scripter |
cs |
자바스크립트 : 인라인
자바스크립트를 타임리프 문법으로 표현하려면, 타임리프 인라인 문법을 적용하는 것이 좋다. 인라인을 적용할려면 <script> 태그에 th:inline 속성을 지정해주면 된다. 인라인 문법을 적용해야하는 이유는 무엇일까?
자바스크립트에 타임리프식으로 데이터를 표시하기 위해서, 타임리프의 th:text=[[${...}]] 문법을 그대로 사용하면 된다. 하지만, 이렇게만 적용하면 실제 HTML 페이지에 자바스크립트를 표시할 때 제대로 작동하지 않거나 불편한 점이 발생할 수 있다. HTML 코드에서 맨 처음 부분인 username, age 부분을 보면 user.username에 해당하는 userA 값이 적용은 되지만, 개발자 도구의 콘솔창에서는 아래와 같은 에러가 발생한 것을 확인할 수 있다.

이것은 자바스크립트로 HTML 상에 문자열을 표시하고 싶을때는 큰 따옴표를 써서 "userA"라고 표시해주어야 하는데, 타임리프에서 th:text에 해당하는 문법을 사용하여 userA라고는 표시했지만, 큰 따옴표로 감싸주지 않았기 때문에 HTML이 자바스크립트의 문법에 맞지 않는 항목이 있다고 알려주는 것이다. 물론, age 값의 경우 숫자이기 때문에 자바스크립트 -> HTML 문법에서 에러가 발생하지 않는다.
다음으로, username2와 같이 주석 표시가 있는 경우 자바스크립트 인라인을 이용하면 이 주석 부분을 표현해준다.
그리고 user와 같이 일반 객체를 표기하는 경우, 인라인을 적용하지 않으면 객체의 정보가 너저분하게 표현되는 반면 인라인 속성 적용 시 객체의 정보를 JSON 형태로 보기 편하게 변환하여 표현해준다.
자바스크립트에 th:each로 반복문을 적용해야 하는 경우에는 아래 코드와 같이 [# ] ... [/] 문법을 적용하면 된다.
java/hello/thymeleaf/basic/BasicController.java
| 1 2 3 4 5 6 7 8 |
@GetMapping("/javascript") public String javascript(Model model) { model.addAttribute("user", new User("UserA", 10)); addUsers(model); return "basic/javascript"; } Colored by Color Scripter |
cs |
resources/templates/basic/javascript.html
| 1 2 3 4 5 6 7 8 9 10 11 12 13 14 15 16 17 18 19 20 21 22 23 24 25 26 27 28 29 30 31 32 33 34 35 36 37 38 39 40 41 42 43 44 |
<!DOCTYPE html> <html xmlns:th="http://www.thymeleaf.org"> <head> <meta charset="UTF-8"> <title>Title</title> </head> <body> <!-- 자바스크립트 인라인 사용 전 --> <script> var username = [[${user.username}]]; var age = [[${user.age}]]; //자바스크립트 내추럴 템플릿 var username2 = /*[[${user.username}]]*/ "test username"; //객체 var user = [[${user}]]; </script> <!-- 자바스크립트 인라인 사용 후 --> <script th:inline="javascript"> var username = [[${user.username}]]; var age = [[${user.age}]]; //자바스크립트 내추럴 템플릿 var username2 = /*[[${user.username}]]*/ "test username"; //객체 var user = [[${user}]]; </script> <!-- 자바스크립트 인라인 each --> <script th:inline="javascript"> [# th:each="user, stat : ${users}"] var user[[${stat.count}]] = [[${user}]]; [/] </script> </body> </html> Colored by Color Scripter |
cs |
페이지 소스 보기

2. 템플릿
단순 요소 삽입, 대체
렌더링 되는 특정 부분을 재사용할 수 있도록 규격화 해놓는 부분을 템플릿이라고 한다. 예를 들어 웹 페이지마다 반복되는 네비게이션바, 푸터 부분 같은 영역이 템플릿이다.
테스트를 위해 새로운 컨트롤러와 html 디렉토리 및 파일을 만든다. 새로 만든 TemplateController에서 /template/fragment/fragmentMain.html View로 이동하고, fragmentMain.html에 footer.html의 요소가 삽입 또는 대체되는 구조다.
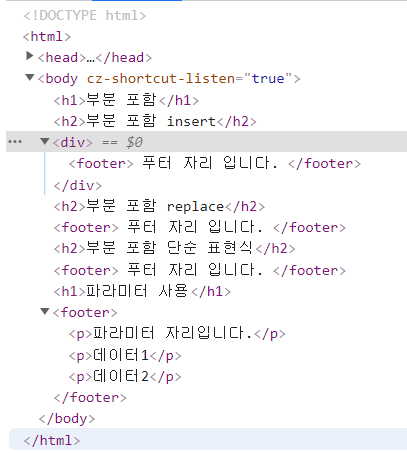
fragment(조각)을 insert 또는 replace 한다
th:fragment="요소이름" 또는 th:fragment="요소이름(파라미터1, 파라미터2, ...)" 으로 요소를 만들고, th:insert=~{요소경로::요소이름}로 요소 삽입, th:replace=~{요소경로::요소이름}로 요소를 대체한다. 즉 insert의 경우에는 <div> 태그 안에 추가된 <footer> 태그를 넣지만, replace는 <div>태그 대신 <footer>태그가 적용된다. 간편식으로 ~{} 부분을 생략하여 경로를 표시할 수도 있는데, 원칙상은 ~{} 기호를 써주는 것이 맞고 복잡해지는 경우에는 적용이 안된다고 하니 ~{}부분은 무조건 작성해주는 것을 기본으로 생각하면 될 것 같다.
java/hello/thymeleaf/basic/TemplateController.java
| 1 2 3 4 5 6 7 8 9 |
@Controller @RequestMapping("/template") public class TemplateController { @GetMapping("/fragment") public String template() { return "template/fragment/fragmentMain"; } } Colored by Color Scripter |
cs |
resources/templates/template/fragment/fragmentMain.html
| 1 2 3 4 5 6 7 8 9 10 11 12 13 14 15 16 17 18 19 20 21 22 23 24 |
<!doctype html> <html xmlns:th="http://www.thymeleaf.org"> <head> <meta charset="UTF-8"> <meta name="viewport" content="width=device-width, user-scalable=no, initial-scale=1.0, maximum-scale=1.0, minimum-scale=1.0"> <meta http-equiv="X-UA-Compatible" content="ie=edge"> <title>Document</title> </head> <body> <h1>부분 포함</h1> <h2>부분 포함 insert</h2> <div th:insert="~{template/fragment/footer::copy}"></div> <h2>부분 포함 replace</h2> <div th:replace="~{template/fragment/footer::copy}"></div> <h2>부분 포함 단순 표현식</h2> <div th:replace="template/fragment/footer::copy"></div> <h1>파라미터 사용</h1> <div th:replace="~{template/fragment/footer::copyParam ('데이터1', '데이터2')}"></div> </body> </html> Colored by Color Scripter |
cs |
resources/templates/template/fragment/footer.html
| 1 2 3 4 5 6 7 8 9 10 11 12 13 14 |
<!doctype html> <html xmlns:th="http://www.thymeleaf.org"> <body> <footer th:fragment="copy"> 푸터 자리 입니다. </footer> <footer th:fragment="copyParam (param1, param2)"> <p>파라미터 자리입니다.</p> <p th:text="${param1}"></p> <p th:text="${param2}"></p> </footer> </body> </html> Colored by Color Scripter |
cs |
결과화면(Elements)
Layout 대체
layout을 대체하는 것은 위 th:fragment를 확장하는 개념이다. fragment로 지정된 조각을 다른 쪽으로 넘기는데, fragment 내부에 선언된 파라미터(여기서는 title, link)가 th:replace가 적용되어 있으면, 넘겨받는 쪽의 태그값으로 대체한다. 이런식으로 작성하면 웹 페이지에 공통인 부분을 만들어놓고, 특정 페이지에서는 글귀나 링크 등만 바꿀 수 있으므로 공통적인 부분 중 다른 부분만 바꿔서 작성하기 편리하다.
컨트롤러에서 layoutMain.html 파일로 이동하도록 만든다.
|
1
2
3
4
|
@GetMapping("layout")
public String layout() {
return "template/layout/layoutMain";
}
|
cs |
resources/templates/template/layout/layoutMain.html
|
1
2
3
4
5
6
7
8
9
10
11
|
<!doctype html>
<html xmlns:th="http://www.thymeleaf.org">
<head th:replace="template/layout/base :: common_header(~{::title}, ~{::link})">
<title>메인 타이틀</title>
<link rel="stylesheet" th:href="@{/css/bootstrap.min.css}"/>
<link rel="stylesheet" th:href="@{/themes/smoothness/jquery-ui.css}"/>
</head>
<body>
메인 컨텐츠
</body>
</html>
|
cs |
resources/templates/template/layout/base.html
|
1
2
3
4
5
6
7
8
9
10
11
12
13
|
<html xmlns:th="http://www.thymeleaf.org">
<head th:fragment="common_header(title, link)">
<title th:replace="${title}">레이아웃 타이틀</title>
<!-- 공통-->
<link rel="stylesheet" type="text/css" media="all" th:href="@{/css/awesomeapp.css}">
<link rel="shortcut icon" th:href="@{/images/favicon.ico}">
<script type="text/javascript" th:src="@{/sh/scripts/codebase.js}"></script>
<!-- 추가-->
<th:block th:replace="${link}" />
</head>
</html>
|
cs |
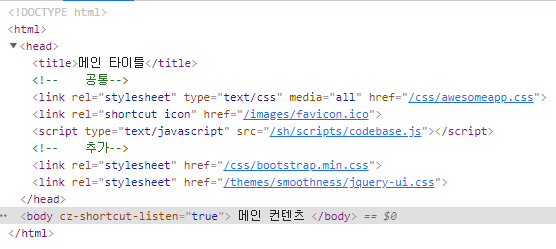
base.html의 fragment를 layoutMain.html 파일에서 활용하는 개념이다. 다만 fragment가 내부의 title과 link는 th:replace가 적용되어 있으므로, layoutMain으로 넘어가서 fragment 내부의 title 및 link 부분은 layoutMain의 title과 link로 대체된다. 다만 link 태그는 2개인데 2개 모두 포함되어 대체되는 것을 확인할 수 있다. 결과 화면의 요소 정보는 아래와 같다.
html 대체
html 전체를 대체하는 확장을 해보자. 전체적으로 같은 양식의 페이지를 수십개 이상 만드는데, header와 section(내용) 부분만 변경하고 싶다면 아래와 같이 응용하면 된다. controller 코드는 생략한다.
controller 에서 다음 layoutExtendMain.html 파일로 이동하도록 한다. html 전체에 th:replace를 걸어주고, title과 section을 파라미터로 받아와서 각 태그에 적힌 내용으로 대체되도록 한다.
resources/templates/template/layoutExtend/layoutExtendMain.html
|
1
2
3
4
5
6
7
8
9
10
11
12
|
<!doctype html>
<html th:replace="~{template/layoutExtend/layoutFile :: layout (~{::title}, ~{::section})}" xmlns:th="http://www.thymeleaf.org">
<head>
<title>메인 페이지 타이틀</title>
</head>
<body>
<section>
<p>메인 페이지 컨텐츠</p>
<div>메인 페이지 포함 내용</div>
</section>
</body>
</html>
|
cs |
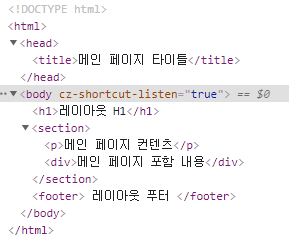
다음은 각 페이지의 양식의 기준이 되는 layoutFile.html 파일이다. 이 fragment에서의 title과 content가 위 실제 파일에서 title, section 부분으로 지정되어 대체된다. 결과 화면의 요소들을 살펴보면, <head>와 <section>부분은 대체되었고, fragment에 있는 <footer> 부분은 layoutExtendMain.html 파일에 삽입된 것을 확인할 수 있다.
resources/templates/template/layoutExtend/layoutFile.html
|
1
2
3
4
5
6
7
8
9
10
11
12
13
14
15
|
<!doctype html>
<html xmlns:th="http://www.thymeleaf.org" th:fragment="layout (title, content)">
<head>
<title th:replace="${title}">레이아웃 타이틀</title>
</head>
<body>
<h1>레이아웃 H1</h1>
<div th:replace="${content}">
<p>레이아웃 컨텐츠</p>
</div>
<footer>
레이아웃 푸터
</footer>
</body>
</html>
|
cs |
참조
1. 인프런_스프링 MVC 2편 - 백엔드 웹개발 핵심 기술_김영한 님 강의
https://www.inflearn.com/course/%EC%8A%A4%ED%94%84%EB%A7%81-mvc-2
'Programming-[Backend] > Spring' 카테고리의 다른 글
| [스프링 웹MVC-2] 4. 메시지, 국제화 (0) | 2021.08.20 |
|---|---|
| [스프링 웹MVC-2] 3. 타임리프/스프링으로 폼 양식 만들기 - th:object, th:field, 체크박스, 라디오 버튼, 셀렉트 박스 (0) | 2021.08.16 |
| [스프링 웹MVC-2] 1. 타임리프 기본 - 1 : 프로젝트 생성, 대표 문법 공부 - text, 변수, 기본 및 편의 객체, 날짜, 유틸리티 (0) | 2021.08.16 |
| [스프링 웹MVC] 14. 웹페이지 실습 ; PRG 패턴, RedirectAttributes (0) | 2021.08.14 |
| [스프링 웹MVC] 13. 스프링 MVC - HTTP 메시지 컨버터, 요청 매핑 핸들러 어댑터 구조 (0) | 2021.08.14 |


