1. Details 정보 넣기
Details는 기본적으로는 username, password 정보를 갖는 객체이지만, 추가로 정보를 넣어 인증 과정에 활용할 수도 있다. 아래 예시는 클라이언트에서 form 태그에서 secret_key라는 정보를 서버로 넘겨주어야만 인증이 되게 하는 방식이다.
SecurityConfig에서 authenticationDetailsSource 사용 설정
우선 SecurityConfig 설정 파일에서 authenticationDetailsSource 메서드를 사용하여 Details 정보를 추가할 수 있도록 설정해준다. .authenticationDetailsSource에 대해 의존성 추가 작업도 해준다.
private final AuthenticationDetailsSource authenticationDetailsSource;

////

@Override
protected void configure(HttpSecurity http) throws Exception {
    http
            .authorizeRequests()
            .antMatchers("/", "/users").permitAll()
            .antMatchers("/mypage").hasRole("USER")
            .antMatchers("/manager").hasRole("MANAGER")
            .antMatchers("/admin").hasRole("ADMIN")
            .anyRequest().authenticated()
            .and()
            .formLogin()
            .authenticationDetailsSource(authenticationDetailsSource)
            .loginPage("/login")
            .loginProcessingUrl("/login_proc")
            .defaultSuccessUrl("/")
            .permitAll()
    ;

}
Details를 담는 그릇, AuthenticationDetailsSource 작성
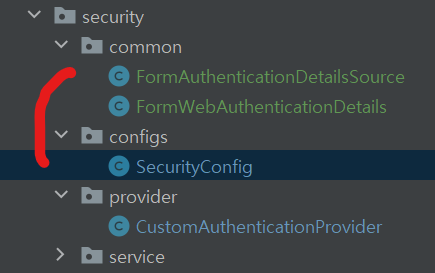
패키지 구조는 위와 같은데, 1차 목표는 authenticationDetailsSource를 구성해야한다. 이를 위해 FormAuthenticationDetailsSource를 작성한다.
@Component
public class FormAuthenticationDetailsSource implements AuthenticationDetailsSource<HttpServletRequest, WebAuthenticationDetails> {
    @Override
    public WebAuthenticationDetails buildDetails(HttpServletRequest context) {
        return new FormWebAuthenticationDetails(context);
    }
}
AuthenticationDetailsSource를 타입에 맞게 상속하여 buildDetails 메서드를 Override해주면 된다. 이때 반환이 필요한 객체는 WebAuthenticationDetails로 정의되어 있기 때문에 FormWebAuthenticationDetails라는 클래스로 하나 만들어준다. 정리하자면 그릇과 같은 AuthenticationDetailsSource를 만들어야되는데, 이 객체가 사용할 수 있는 WebAuthenticationDetails 알맹이를 만드는 것이다.
이 객체는 @Component로 Bean으로 등록되므로, SecurityConfig 파일에서 authenticationDetailsSource를 의존하는 구문을 작성하면 해당 객체가 참조되는 구조이다.
Details 정보 : WebAuthenticationDetails 작성
//사용자가 전달하는 추가적인 파라미터들을 저장
public class FormWebAuthenticationDetails extends WebAuthenticationDetails {

    private String secretKey;

    public FormWebAuthenticationDetails(HttpServletRequest request) {
        super(request);
        secretKey = request.getParameter("secret_key");
    }

    public String getSecretKey() {
        return secretKey;
    }

}
WebAuthenticationDetails를 상속하고 인증에 사용할 secretKey를 정의한다. request.getParameter를 통해 "secret_key"라는 파라미터값을 받아와서 Details의 secretKey로 저장한다. 따라서 요청에 "secret_key"라는 값을 넣어줘야 하는데, 이 부분이 아래 클라이언트에서 전달해주는 값이 된다.
클라이언트에서의 전달값 : secret_key 전달
<form th:action="@{/login_proc}" class="form-signin" method="post">
<!--            <form name="frm" id="frm" action="#" method="post" onsubmit="return false" class="form-signin">-->
                <input th:type="hidden" th:value="secret" name="secret_key">
                <div class="form-group">
                    <input type="text" class="form-control" name="username" placeholder="아이디" required="required"
                           autofocus="autofocus">
                </div>
                <div class="form-group">
                    <input type="password" class="form-control" name="password" placeholder="비밀번호" required="required">
                </div>

                <div class="form-group">
                    Remember Me<input type="checkbox" name="remember-me" />
                </div>
                <!--<div th:if="${param.error}" class="form-group">
                    <span th:text="${session[SPRING_SECURITY_LAST_EXCEPTION]}"
                          class="alert alert-danger">잘못된 아이디나 암호입니다</span>
                </div>-->
                <button type="submit" class="btn btn-lg btn-primary btn-block">로그인</button>
<!--                <button type="submit" onclick="formLogin()" id="formbtn" class="btn btn-lg btn-primary btn-block">로그인</button>-->
            </form>
hidden 타입의 input 태그로 name="secret_key", value = "secret"으로 전달한다. 이것이 앞서 작성한 request.getParameter("secret_key")이다.
Provider에서 인증 과정에 추가
이제 details를 이용해서 인증을 가능하게 했고(SecurityConfig), 이것을 사용하는 구조 및 내용도 만들었다. 이제 인증 과정에서 어떤 로직을 통해서 이 구조 및 내용을 활용할지를 작성해주면 된다.
@Override
public Authentication authenticate(Authentication authentication) throws AuthenticationException {
    //설계나 정책에 따라서 인증 메서드를 다양하게 구현할 수 있다. 아래는 가장 기본적인 예시이다.

    String username = authentication.getName();
    String password = (String) authentication.getCredentials(); //Object 타입으로 반환되어 캐스팅

    AccountContext accountContext = (AccountContext) userDetailsService.loadUserByUsername(username); //직접 만든 클래스로 캐스팅

    if(!passwordEncoder.matches(password, accountContext.getAccount().getPassword())) {
        throw new BadCredentialsException("BadCredentialsException");
    }

    FormWebAuthenticationDetails formWebAuthenticationDetails = (FormWebAuthenticationDetails) authentication.getDetails();
    String secretKey = formWebAuthenticationDetails.getSecretKey();

    if(!"secret".equals(secretKey)) {
        throw new InsufficientAuthenticationException("InsufficientAuthenticationException");
    }

    //인증 성공 시 성공한 인증 객체를 생성 후 반환
    return new UsernamePasswordAuthenticationToken(accountContext.getAccount(), null, accountContext.getAuthorities());
}
중간부분 BadCredentials... 아래 부분부터 FormWebAuthenticationDetails를 검사한다. 만약 클라이언트로부터 받아온 secretKey의 value 값이 "secret"이 아니라면 InsufficientAuthenticationException을 발생시킨다.
Details 정보를 이용하여 추가적인 인증과정이 필요하다면 이 내용들을 적용하면 될 것 같다.
2. 인증 성공 핸들러
인증 성공 핸들러는 AuthenticationSuccessHandler이다. 이전 글들에서 이미 살펴봤던 기능으로, 간단하게만 서술한다. 사용자가 로그인 전에 접속한 페이지를 RequestCache에 저장했다가 로그인이 되면 해당 페이지로 보내주는 기능을 작성해본다. 인증 성공 시 지정한 로직으로 처리를 하기 위해서 CustomAuthenticationHandler를 만든다.
@Component
public class CustomAuthenticationHandler extends SimpleUrlAuthenticationSuccessHandler {

    private RequestCache requestCache = new HttpSessionRequestCache();

    private RedirectStrategy redirectStrategy = new DefaultRedirectStrategy();

    @Override
    public void onAuthenticationSuccess(HttpServletRequest request, HttpServletResponse response, Authentication authentication) throws IOException, ServletException {

        //기본 이동 url 설정
        setDefaultTargetUrl("/");

        SavedRequest savedRequest = requestCache.getRequest(request, response);

        //사용자가 인증 전에 다른 자원에 접근한 적이 없다면 savedRequest 객체는 null 일수도 있다.
        if (savedRequest != null) {
            String targetUrl = savedRequest.getRedirectUrl();
            redirectStrategy.sendRedirect(request, response, targetUrl);
        } else {
            redirectStrategy.sendRedirect(request, response, getDefaultTargetUrl());
        }
    }
}
SimpleUrlAuthenticationSuccessHandler를 상속하는데, 이것은 AuthenticationSuccessHandler를 상속하는 클래스이다. 여기서 onAuthenticationSuccess 메서드를 상속하여 로직을 처리한다. 로직을 구현하는데 필요한 RequestCache, RedirectStrategy 객체를 불러오고, if문으로 분기하여 처리한다. setDefaultTargetUrl, getDefaultTargetUrl로 defaultUrl을 설정할 수 있다는 것도 기억하자.
다른 부분들과 똑같이, 이 클래스도 Bean으로 스캔되게 하기 위해서 @Component 어노테이션을 추가한다.
그리고 SecurityConfig에서 SuccessHandler를 추가해준다.
private final AuthenticationSuccessHandler authenticationSuccessHandler;

//중략

@Override
protected void configure(HttpSecurity http) throws Exception {
    http
            .authorizeRequests()
            .antMatchers("/", "/users").permitAll()
            .antMatchers("/mypage").hasRole("USER")
            .antMatchers("/manager").hasRole("MANAGER")
            .antMatchers("/admin").hasRole("ADMIN")
            .anyRequest().authenticated()
            .and()
            .formLogin()
            .authenticationDetailsSource(authenticationDetailsSource)
            .loginPage("/login")
            .loginProcessingUrl("/login_proc")
            .defaultSuccessUrl("/")
            .successHandler(authenticationSuccessHandler)
            .permitAll()
    ;

}
이제 동작을 테스트 해보면 로그인 후, 로그인 전에 접근했던 페이지로 이동하는 것을 확인할 수 있다.
참조


