1. 인증 실패 처리
인증 실패를 처리하는 과정은 이전 글의 인증 성공처리를 하는 부분과 매우 유사하다.
CustomAuthenticationHandler를 작성한다.
@Component
public class CustomAuthenticationFailureHandler extends SimpleUrlAuthenticationFailureHandler {

    @Override
    public void onAuthenticationFailure(HttpServletRequest request, HttpServletResponse response, AuthenticationException exception) throws IOException, ServletException {

        String errorMessage = "Invalid Username or Password";

        if (exception instanceof BadCredentialsException) {
            errorMessage = "Invalid Username or Password";
        } else if (exception instanceof InsufficientAuthenticationException) {
            errorMessage = "Invalid Secret Key";
        }

        setDefaultFailureUrl("/login?error=true&exception=" + errorMessage);

        super.onAuthenticationFailure(request, response, exception);
    }
}
인증 성공 처리와 비슷하게 onAuthenticationFailure 메서드를 Override 하면된다. 다만 여기서는 실패 시 exception을 받아와서 처리해주기 때문에, exception의 타입에 따라서 errorMessage를 달리할 수 있다.
그리고 setDefaultFailureUrl 메서드에서 경로를 동적으로 지정하여 url을 바꾸어 프론트로 전달해줄 수 있다. 이런 경우 프론트에서 사용자에게 에러의 원인 등을 표시하기가 용이하다.
SecurityConfig에서는 유사하게 failureHandler만 추가해주면 된다.
private final AuthenticationFailureHandler customAuthenticationFailureHandler;

//중략

@Override
protected void configure(HttpSecurity http) throws Exception {
    http
            .authorizeRequests()
            .antMatchers("/", "/users", "user/login/**", "/login*").permitAll()
            .antMatchers("/mypage").hasRole("USER")
            .antMatchers("/manager").hasRole("MANAGER")
            .antMatchers("/admin").hasRole("ADMIN")
            .anyRequest().authenticated()
            .and()
            .formLogin()
            .authenticationDetailsSource(authenticationDetailsSource)
            .loginPage("/login")
            .loginProcessingUrl("/login_proc")
            .defaultSuccessUrl("/")
            .successHandler(customAuthenticationSuccessHandler)
            .failureHandler(customAuthenticationFailureHandler)
            .permitAll()
    ;

}
Controller와 화면에서는 각각 아래와 같이 처리한다. 스프링 MVC 2편에서 배운 것처럼 @RequestParam은 생략해줘도 된다. model 객체에 error와 exception을 담아서 View로 전달해주면, view 에서 param.error, exception을 추출하여 화면에 보여주는 형태이다.
@GetMapping("/login")
public String login(@RequestParam(value = "error", required = false) String error,
               @RequestParam(value = "exception", required = false) String exception, Model model) throws Exception {

   model.addAttribute("error", error);
   model.addAttribute("exception", exception);

   return "login";
}
<div th:if="${param.error}" class="form-group">
    <span th:text="${exception}" class="alert alert-danger">잘못된 아이디나 암호입니다</span>
</div>
2. 접근 거부 처리 : Access Denied
인증은 되었으나 권한이 없어서 인가 예외를 발생시키는 경우에 대해 학습한다. 인가 예외는 인증 필터가 처리하는 것이 아니라 필터 중 맨 마지막의 AbstractSecurityInterceptor에 의해 발생된다(AccessDeniedException 발생). 그리고 이 exception의 처리는 ExceptionTranslationFilter의 AccessDeniedHandler에서 처리한다. 실습을 위해 아래와 같이 SecurityConfig에 exceptionHandling() 메서드와 accessDeniedHandler를 추가해준다.
※ 여태껏 .and()로 구분되는 것을 볼 수 있는데, 이것은 의미단위로 구분하는 구분자이다. 정확하게는 설정 정보를 xml 단위로 작성할 때, xml 태그의 구분 단위라고 보면 된다. 일단은 그냥 비슷한 기능을 하는 속성끼리 모아준다고 생각하자.
설정 파일 처리
@Bean
public AccessDeniedHandler accessDeniedHandler() {
    CustomAccessDeniedHandler accessDeniedHandler = new CustomAccessDeniedHandler();
    accessDeniedHandler.setErrorPage("/denied");
    return accessDeniedHandler;
}

//중략


@Override
    protected void configure(HttpSecurity http) throws Exception {
        http
                .authorizeRequests()
//                .antMatchers("/mypage").hasRole("USER")
                .antMatchers("/messages").hasRole("ROLE_MANAGER")
//                .antMatchers("/config").hasRole("ADMIN")
                .antMatchers("/**").permitAll()
                .anyRequest().authenticated()
                .and()
                .formLogin()
                .loginPage("/login")
                .loginProcessingUrl("/login_proc")
                .defaultSuccessUrl("/")
                .authenticationDetailsSource(authenticationDetailsSource)
                .successHandler(customAuthenticationSuccessHandler)
                .failureHandler(customAuthenticationFailureHandler)
                .and()
                .exceptionHandling()
                .accessDeniedHandler(accessDeniedHandler())
        ;
    }
@Bean AccessDeniedHandler 부분은 아래 구현체 다음으로 설명한다.
AccessDeniedHandler
AccessDeniedException을 처리하는 accessDeniedHandler의 구현체를 작성한다.
public class CustomAccessDeniedHandler implements AccessDeniedHandler {

    private String errorPage;

    @Override
    public void handle(HttpServletRequest request, HttpServletResponse response, AccessDeniedException e) throws IOException, ServletException {
        String deniedUrl = errorPage + "?exception=" + e.getMessage();
        response.sendRedirect(deniedUrl);
    }

    public void setErrorPage(String errorPage) {
        this.errorPage = errorPage;
    }
}
handle 메서드를 Override 하였다. 그리고 Url에 e.getMessage()를 통해서 에러가 발생한 원인을 클라이언트쪽으로 전달해주게 된다. AccessDeniedException의 default값은 "Access is Denied" 이다.
@Autowired 대신 @Bean 활용
CustomAccessDeniedHandler를 SecurityConfig 파일에서 @Autowired로 의존성 주입을 하는 것이 아니라 @Bean으로 만들어 주었다. 이것은 accessDeniedHandler를 그대로 불러와서 사용하는 것이 아니라 일단은 default 생성자로 생성하고, errorPage라는 필드값에 "/denied" 라는 url을 set 하는 로직을 직접 적용하기 때문이다.
다시 말해서, CustomAccessDeniedHandler에는 생성자는 없고 수정자인 setErrorPage만 있는데 여기에 errorPage를 파라미터로 하는 생성자를 만들면 된다. 그리고 SecurityConfig 설정 정보에서는 @Autowired를 통해서 CustomAccessDeniedHandler를 불러오면서 errorPage("/denied")를 인자로 넣어주면 되는 것이다.
View 설정
마지막으로 /denied url로 설정한 view 부분을 작성한다.
<!DOCTYPE html>
<html lang="en" xmlns:th="http://www.thymeleaf.org"
      xmlns:sec="http://www.thymeleaf.org/thymeleaf-extras-springsecurity5">
<head th:replace="layout/header::userHead"></head>
<body>
<div th:replace="layout/top::header"></div>

<div class="container">
    <div class="row align-items-start">
        <nav class="col-md-2 d-none d-md-block bg-light sidebar">
            <div class="sidebar-sticky">
                <ul class="nav flex-column">
                    <li class="nav-item">
                        <div style="padding-top:10px;" class="nav flex-column nav-pills" aria-orientation="vertical">
                            <a th:href="@{/}" style="margin:5px;" class="nav-link text-primary">홈</a>
                            <a th:href="@{/mypage}" style="margin:5px;" class="nav-link text-primary">마이페이지</a>
                            <a th:href="@{/messages}" style="margin:5px;" class="nav-link text-primary">메시지</a>
                            <a th:href="@{/config}" style="margin:5px;" class="nav-link text-primary">환경설정</a>
                        </div>
                    </li>
                </ul>
            </div>
        </nav>
        <div style="padding-top:50px;" class="col">
            <div class="container text-center">
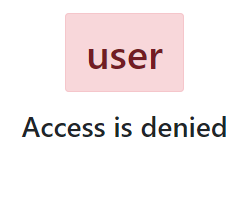
                <h1><span th:text="${username}" class="alert alert-danger">접근 권한 없음</span></h1>
                <br />
                <h3 th:text="${exception}"></h3>
            </div>
        </div>
    </div>

</div>
<div th:replace="layout/footer::footer"></div>
</body>
</html>
맨 마지막 줄의 exception을 handler에서 전달받게 된다.
결과
.exceptionHandling() 과 .accessDeniedHandler() 처리가 되지 않으면 아래와 같이 Whitelabel Error Page가 보인다.

적용 후에는 View와 url이 변경되는 것을 확인할 수 있다.


참조


