자주 사용하는 Authorization flow들에 관련한 내용들을 정리했다. 그리고 Keycloak을 통해 flow를 설정하는 방법에 대해서도 알아본다.
keycloak 25.0.2 사용
기본 https로 구성(CIBA flow의 경우에만 http 사용)
realm, client 및 user는 특수문자가 들어가지 않게만 잘 만들어주면 됨
1. Authorization code flow
Ref.) Keycloak Authorization code flow

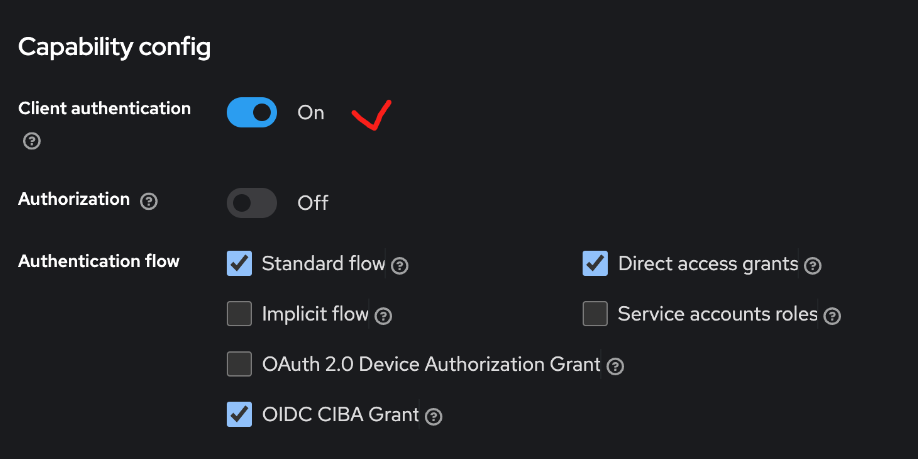
keycloak console에서 아래와 같이 Standard flow에 체크한다.

기본적으로 브라우저 기반 방식이다.
1. redirect_uri, scope와 함께 keycloak으로 요청을 보내면 keycloak에서 로그인 페이지 표시

[GET] https://{keycloak-host}/realms/{realm-id}/protocol/openid-connect/auth?redirect-uri={backend-redirect-uri}&scope=openida. redirect_uri는 keycloak admin console에서 Valid redirect URIs에 적힌 내용에 포함되어야 한다. 아래 사진처럼 /* 는 보안상 사용을 자제하고 client별로 구체적인 redirect URI들을 지정해줘야한다.

2. 로그인 시 Keycloak은 사용자를 redirect_uri로 리다이렉트함. 이에 맞는 백엔드 서버 코드는 아래와 같음
@GetMapping("/auth/redirect")
public String authRedirect(@RequestParam(name = "code", required = false) String authorizationCode) {
  if (authorizationCode != null) {
    return "Authorization Code received! Ready to exchange for token." + "<br>" +
        "code:" + "<br>" + authorizationCode;
  } else {
    return "Authorization Code not found!";
  }
}

3. 아래 요청을 보낸다.
[POST] https://{keycloak-host}/realms/{realm-id}/protocol/openid-connect/token
"Content-type" : "application/x-www-form-urlencoded"

"redirect_uri": "{1번 단계에서 넣어준 redirect_uri와 반드시 일치}"
"grant_type": "authorization_code"
"client_id": "{client_id}"
"client_secret": "{client_secret}"
"code": "{2번 단계에서 얻은 code값}"
a. client secret 값은 client 설정에서 Client authentication 토글을 ON 하면 생성되는 Credentials 탭에서 확인할 수 있다. Client secret 값을 얻은 후에는 Client authentication 토글을 OFF 처리하고 진행해야한다. 그리고 해당 토글을 ON 할 때마다 Client Secret이 변경되니 주의한다.

b. Keycloak으로부터 아래와 같이 token 값들을 얻어올 수 있다.

2. PKCE 방식(Proof Key Code Exchange)

1번 항목: Authorization Code Flow와 같은 flow인데, 보안을 위해 요청의 body에 값을 추가하는 방식
Authorization Code Grant flow를 구현하는 표준은 OAuth2.0이 있으나, 최근 OAuth2.1로 업데이트 되면서 PKCE([픽시]) 라는 개념도 도입함
기존 OAuth2.0 플로우
- 클라이언트 -> 리소스 서버에 GET 요청 -> 사용자가 ID, PW 입력 -> 서버가 Authorization Code를 클라이언트에 내려줌
- 클라이언트는 Authorization Code와 함께 ClientID, ClientPassword 등을 서버에 POST 요청하여 Access Token을 얻음.
- 얻어온 Access Token으로부터 사용자에 관련된 역할, profile 정보 등을 확인
기존 문제점
- 서버에서 Authorization Code를 클라이언트에 내려줄 때, 공격자가 이를 감청하면 서버에 Authorization Code를 전달하여 Access Token을 얻어서 해킹 가능
PKCE OAuth2.1 방식
- 클라이언트가 단방향 hashing을 이용해서 code_verifier - code_challenge 값을 만들어서 서버에 GET 요청 시 파라미터로 code_challenge 값을 전달
- code-verifier는 클라이언트만 들고 있음
- 클라이언트가 Authorization Code와 함께 서버에 POST 요청 시, code verifier 값을 같이 전송
- 서버가 code verifier 값을 보고 올바른 클라이언트라면 access token을 내려줌
- 공격자가 code_challenge 값을 클라이언트의 GET 요청에서 얻을 수 있지만, code_challenge는 code_verifier로 부터 <단방향 해시함수>로 만들어졌기 때문에 code_challenge로부터 code_verifier를 유추할 수는 없음
실행 flow
1. 아래의 코드를 통해서 code_challenge 및 code_verifier를 생성한다.
public class PkceUtil {

  // verifier 생성 메소드
  public static String generateVerifier(int length) {
    String possible = "ABCDEFGHIJKLMNOPQRSTUVWXYZabcdefghijklmnopqrstuvwxyz0123456789";
    StringBuilder verifier = new StringBuilder(length);
    Random random = new Random();

    for (int i = 0; i < length; i++) {
      verifier.append(possible.charAt(random.nextInt(possible.length())));
    }

    return verifier.toString();
  }

  // challenge 생성 메소드
  public static String generateCodeChallenge(String codeVerifier, String method) throws NoSuchAlgorithmException {
    if ("S256".equalsIgnoreCase(method)) {
      // SHA-256 해시를 계산하고 Base64 URL 인코딩
      MessageDigest digest = MessageDigest.getInstance("SHA-256");
      byte[] hash = digest.digest(codeVerifier.getBytes(StandardCharsets.UTF_8));
      return base64urlEncode(hash);
    } else {
      // 'plain' 메소드를 사용할 경우, codeVerifier를 그대로 반환
      return codeVerifier;
    }
  }

  // Base64 URL 인코딩 메소드
  private static String base64urlEncode(byte[] data) {
    return Base64.getUrlEncoder().withoutPadding().encodeToString(data);
  }
}
@SpringBootTest
class PkceUtilTest {

  @Test
  public void makePkce() {
    String verifier = generateVerifier(128); // 예: 128 길이의 verifier 생성
    String challenge = null;
    try {
      challenge = generateCodeChallenge(verifier, "S256");
    } catch (NoSuchAlgorithmException e) {
      throw new RuntimeException(e);
    }

    System.out.println("Verifier: " + verifier);
    System.out.println("Challenge: " + challenge);
  }

}
2. code_challenge 값과 함께 GET 요청 전송
[GET] https://{keycloak-host}/realms/{realm-id}/protocol/openid-connect/auth?redirect-uri={backend-redirect-uri}&scope=openid&code_challenge=1D_NnuGpphILKTiMo6fCHNqiVZoY15QBAxqMqHiBC4w&code_challenge_method=S256
3. 2.에서 받아온 code 값을 포함하여 아래 요청 전송
[POST] https://{keycloak-host}/realms/{realm-id}/protocol/openid-connect/token
"Content-Type": "application/x-www-form-urlencoded"

"redirect_uri": "{1번 단계에서 넣어준 redirect_uri와 반드시 일치}"
"grant_type": "authorization_code"
"client_id": "{client_id}"
"client_secret": "{client_secret}"
"code": "{2번 단계에서 얻은 code값}"
"code_verifier": "{1번 단계에서 생성한 code_verifier 값}"
3. Client Credential Grant(Service Account, SA)

유저의 로그인이 아니라 서비스가 인증받는 flow. 인증을 받은 후 다른 Resource Server의 API 등을 이용한다.
keycloak 세팅에서 Client Authentication 토글을 ON하고, Service account roles 옵션을 키면 됨. 이후 아래와 같은 요청을 전송
[POST] https://{keycloak-host}/realms/{realm_id}/protocol/openid-connect/token
"Content-Type": "application/x-www-form-urlencoded"

"grant_type": "{client_credentials}"
"client_id": "{client_id}"
"client_secret": "{client_secret}"
access_token, expirese_in, refresh_expires_in, token_type, not-before-policy, scope 정보를 응답으로 받는다.
4. CIBA flow(Client Initiated Backchannel Authentication)
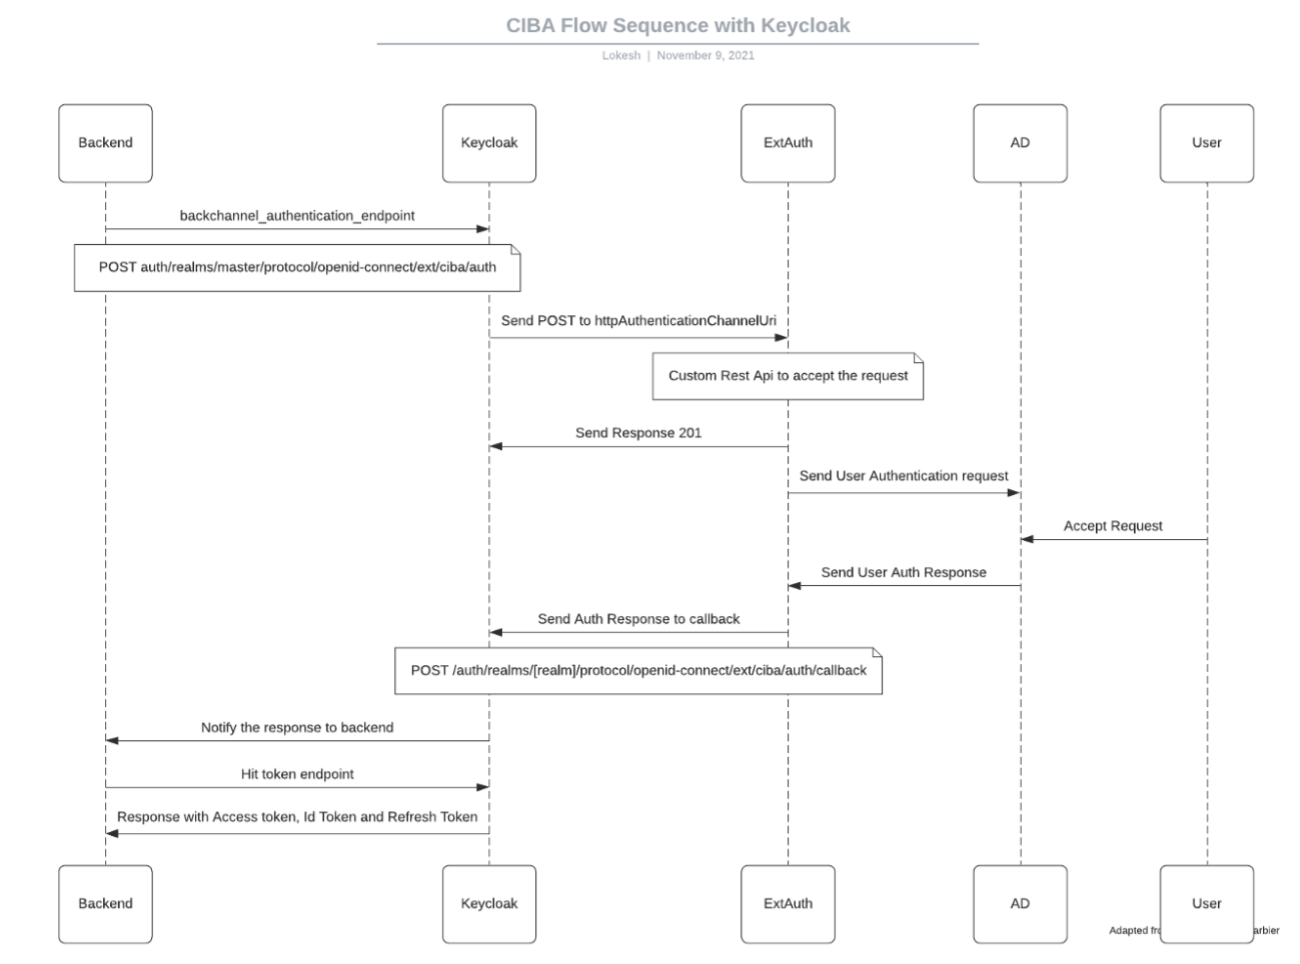
Ref.) https://www.grootan.com/casestudies/how-to-use-ciba-with-keycloak

Keycloak에서 사용자의 id/password를 직접 받는 것이 아니라 제 3의 인증 수단을 통해 사용자를 인증하고 이를 Keycloak에게 전달하는 방식
user가 password를 잊어버리더라도 제 3의 인증수단에 대한 인증만 된다면 인증이 가능하다.
1. Keycloak 서버 구동
Keycloak을 실행할 때, Backchannel로 사용할 External Auth의 endpoint를 지정한다.
{keycloak_home}/bin/kc.sh start-dev --spi-ciba-auth-channel-ciba-http-auth-channel-http-authentication-channel-uri=http://host.docker.internal:8082/ciba-request
- host.docker.internal로 keycloak용 docker container가 아닌 실제 localhost쪽을 바라보도록 한다.
- localhost:8082에 ExtAuth용 서버를 띄우고 /ciba-request 엔드포인트에 대한 컨트롤러를 아래와 같이 작성한다.
@PostMapping("/ciba-request")
  public ResponseEntity<Void> cibaRequest(@RequestHeader Map<String, String> headers, @RequestBody Map<String, String> body) {
    System.out.println("#" + headers);
    System.out.println("#" + body);
    return new ResponseEntity<>(HttpStatus.CREATED);
  }
2. Keycloak console 설정
Authentication → Policies → CIBA Policy에서 설정 확인

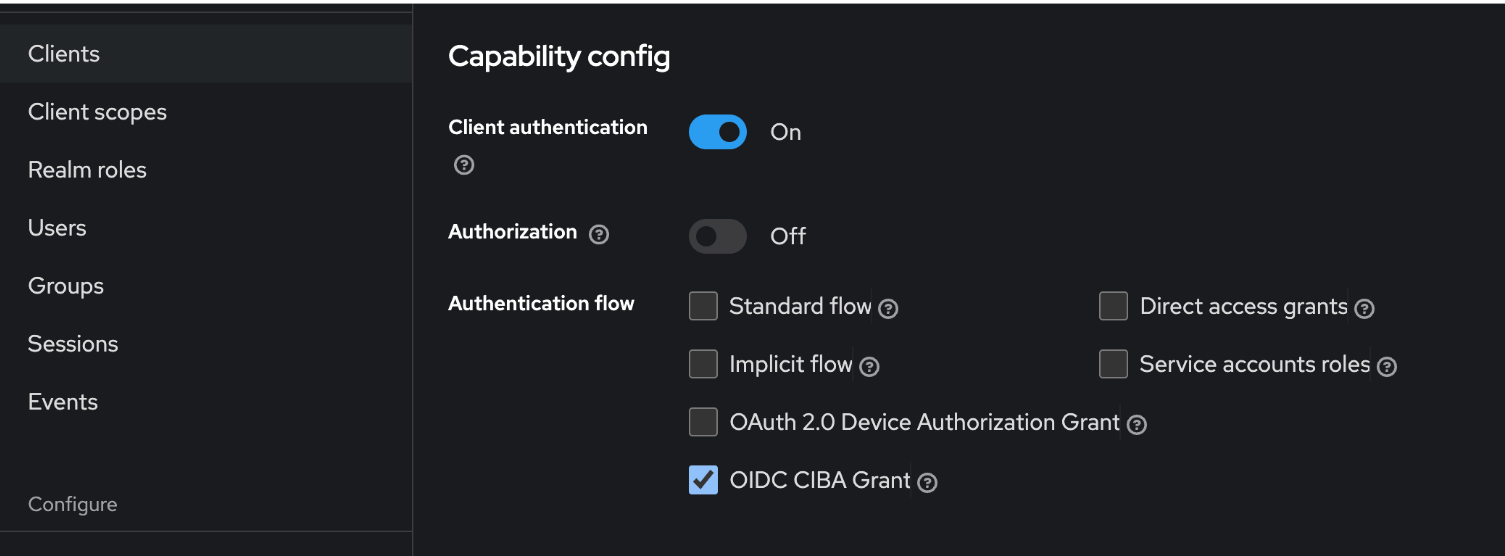
Clients → Capability Config → Client authentication ON, OIDC CIBA Grant 체크

3. Keycloak에 auth 시작 요청
아래 요청을 전송한다.
[POST] http://{keycloak-host}/realms/{realm_id}/protocol/openid-connect/ext/ciba/auth
'Content-type': 'application/x-www-form-urlencoded'

"client_id": "{cliend_id}",
"cliend_secret": "{client_secret}",
"login_hint": "{username}", //현재 username 값만 지원
"scope": "openid",
"binding_message": "hello" //optional value
다음과 같은 형식의 응답을 얻는다.

또한 서버단(/ciba-request)에서 authorization을 위한 token 값을 console 창에서 확인할 수 있다.

4. Keycloak에 Backchannel 인증 확인 요청
[POST] http://{keycloak_host}/realms/{realm_id}/protocol/openid-connect/token
'Content-Type': 'application/x-www-form-urlencoded'

"grant_type": "urn:openid:params:grant-type:ciba",
"auth_req_id": {3번 과정에서 얻어온 auth_req_id 값},
"client_id": "{client_id}",
"client_secret": "{client_secret}"
다음과 같은 형식의 응답을 얻는다.

아직 Authentication Device에서 인증이 오지 않은 상태이기 때문에 pending 상태임을 확인할 수 있다.
5. AD 인증
다음 요청을 전송한다. keycloak의 callback 엔드포인트에 AD가 인증 여부를 전송해주는 요청이다.
[POST] http://{keycloak_host}/realms/{realm_id}/protocol/openid-connect/ext/ciba/auth/callback
'Content-Type': 'application/json'
'Authorization': 'Bearer {3번 과정에서 서버단에서 얻은 authorization_code값}'

"status": "SUCCEED | UNAUTHORIZED | CANCELED"
다음과 같은 응답을 얻는다.
6. 이후 과정 4에서의 요청을 다시 전송 시, access_token 등의 값을 얻을 수 있다.
[POST] http://{keycloak_host}/realms/{realm_id}/protocol/openid-connect/token
'Content-Type': 'application/x-www-form-urlencoded'

"grant_type": "urn:openid:params:grant-type:ciba",
"auth_req_id": {3번 과정에서 얻어온 auth_req_id 값},
"client_id": "{client_id}",
"client_secret": "{client_secret}"
참고
'Programming-[Backend] > Keycloak' 카테고리의 다른 글
| Keycloak Device flow (3) | 2024.09.17 |
|---|---|
| [TIL] Keycloak logout (0) | 2024.09.09 |
| Keycloak - 12. Keycloak 확장 (0) | 2024.08.10 |
| Keycloak - 11. 토큰 및 세션 관리 (0) | 2024.08.10 |
| Keycloak - 10. 사용자 인증: OTP, WebAuthn, passkey (0) | 2024.08.09 |


